
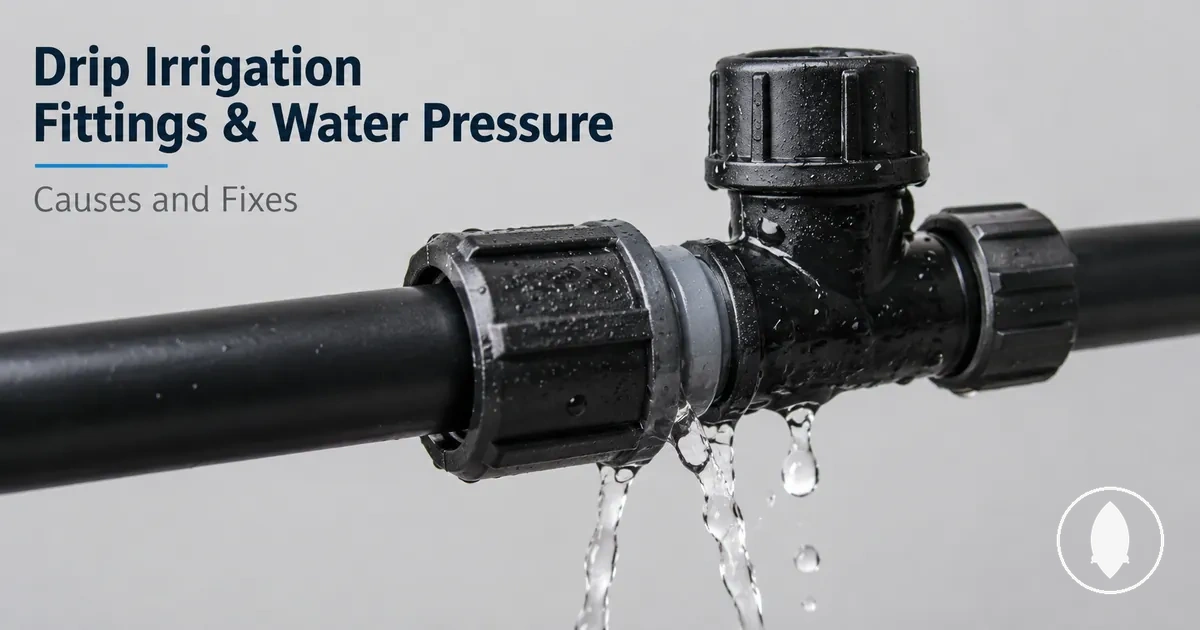
Drip Irrigation Fittings and Water Pressure Problems
When drip irrigation fittings leak, pop off, or produce uneven flow, water pressure may be affecting the connection between the tubing and connectors. Pressure problems usually appear as connection-level failures influenced by pressure range, fit, and regulation. A pressure issue can increase leak risk, but it is only one possible cause alongside poor fit, installation, clogging, or tubing condition.
Water pressure is the force that moves water through a drip irrigation system, while the pressure range describes the operating conditions that drip irrigation fittings and tubing are intended to handle. A pressure regulator can help manage line pressure before it reaches the connectors. Compatibility between the tubing, fittings, and regulator remains important because an unsuitable fit may still lead to leaks or instability.
If connectors begin popping off, leaks develop around joints, or uneven flow appears across the irrigation line, checking water pressure is a sensible starting point. These symptoms should be considered together with tubing condition, connector fit, and pressure regulation rather than pressure alone. For broader fitting types, sizing, and application guidance, visit the drip irrigation fittings hub before narrowing the diagnosis to pressure-related causes.
Resolving pressure-related issues usually starts by comparing the system's pressure range with the installed tubing and connectors before replacing components. This approach helps separate pressure-related problems from other fitting or tubing issues and leads naturally into diagnosing pressure range, regulation, and suitable repair options.
Normal Pressure Range for Drip Irrigation Fittings
Normal pressure range for drip irrigation fittings depends on the pressure rating of the fittings, tubing, and the overall system design. There is no exact universal PSI that suits every drip system. The appropriate operating pressure should remain within the manufacturer limit for the weakest compatible component.
Normal Pressure Range for Drip Irrigation Fittings is easier to understand by following the pressure path from the water source through the regulator to the tubing and fitting connection. The diagram below shows how pressure direction and regulation can influence fitting stability without suggesting one fixed PSI for every installation.
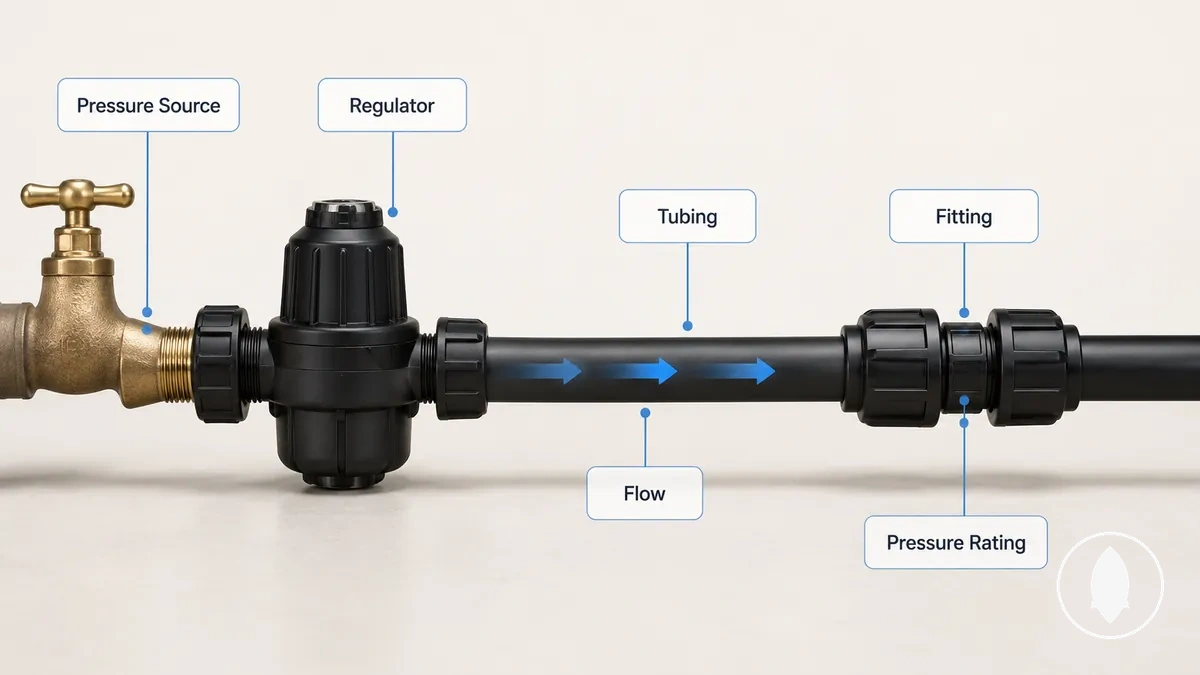
A pressure rating describes the pressure limit a fitting or tubing is designed to handle, while operating pressure is the pressure present during normal system use. These values are not necessarily the same. Compatibility between the tubing, drip irrigation fittings, and regulator helps determine whether connections remain stable under working pressure. Before changing system pressure, verify the manufacturer limit for each connected component.
In a low-pressure line, reduced operating pressure may contribute to uneven flow if the system is not designed for those conditions. A regulated drip line usually maintains a more stable operating pressure, while a higher-pressure tap connection may require a regulator before water enters the drip tubing. Before diagnosing leaks or pop-offs, compare the operating pressure with the manufacturer limit of the weakest fitting or tubing component.
Normal Pressure Range for Drip Irrigation Fittings can be assessed more clearly by grouping pressure conditions according to fitting risk rather than relying on one fixed PSI value. The table below summarizes common conditions and the checks that may help identify pressure-related issues.
| Pressure condition | What it may indicate | Fitting risk | What to check |
|---|---|---|---|
| Too low | Reduced operating pressure or restricted flow | Uneven flow | Regulator setting, tubing condition, and possible flow restrictions |
| Normal regulated | Operating pressure is within the intended working range | Lower likelihood of leaks or pop-offs when components are compatible | Pressure rating and manufacturer limit |
| Excessive pressure | Line pressure may exceed the intended operating pressure | Higher likelihood of leaks and pop-offs | Pressure regulator, pressure source, and the weakest tubing or fitting limit |
When Pressure Is Too High
Excessive pressure can place extra stress on a fitting joint and may force weak connections to leak, spray, or release unexpectedly. Steady high pressure and short pressure spikes can both increase tubing stress, although they may affect the connection differently. A leak or pop-off does not necessarily mean pressure is the only cause, but it is an important condition to check.
When Pressure Is Too High is easiest to diagnose by examining the fitting joint where pressure-related symptoms usually appear. The annotated illustration below highlights the pressure path and the connection area where local stress may develop.
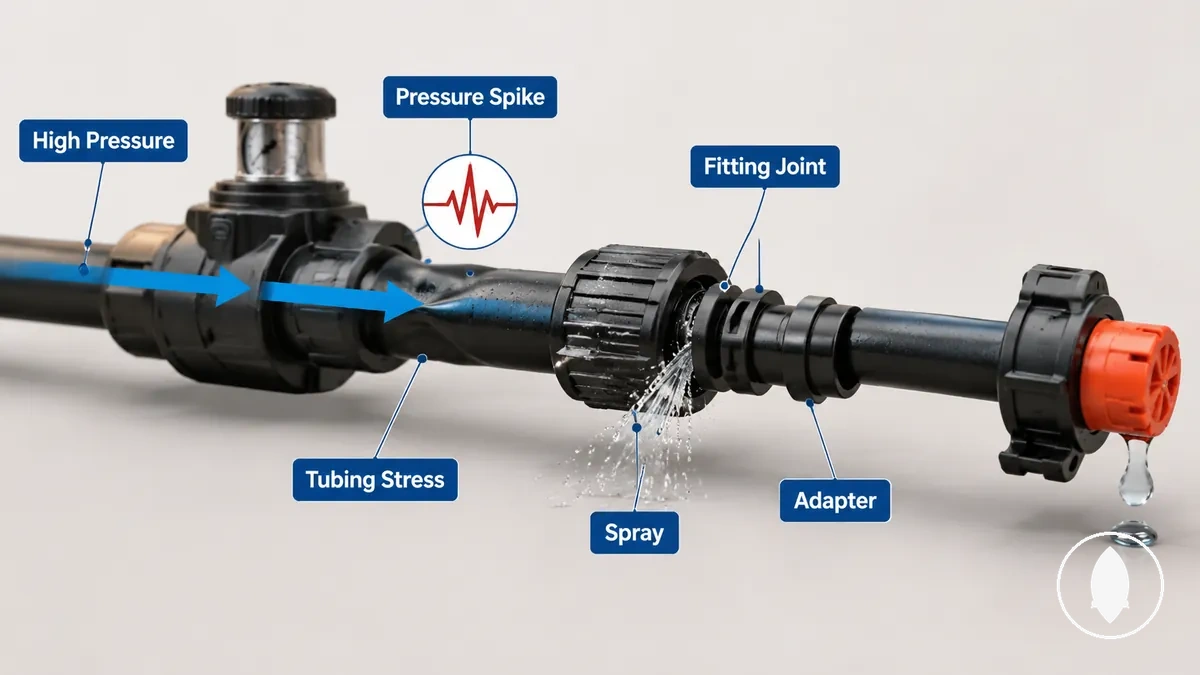
Common signs of excessive pressure at the fitting joint include:
- Leak developing around the fitting joint or adapter
- Fine spray escaping from a connection under high pressure
- Connector pop-off following a pressure spike or pressure surge
- Visible tubing stress or deformation near the connection
- Repeated connector failure at the same fitting location
If these symptoms continue, compare the connection with its expected operating conditions and check whether excessive pressure, a pressure spike, or another local fitting issue is increasing the pressure load before moving to more detailed diagnosis.
When Pressure Is Too Low
Low pressure usually causes weak flow or uneven flow through the drip line rather than forcing a fitting connection to release. Reduced pressure commonly affects water delivery before it creates connection stress. This distinction helps separate low-pressure flow symptoms from the fitting stress more often associated with high pressure.
When Pressure Is Too Low is easier to assess by comparing water delivery across the drip line, emitter, and branch line. The illustration below shows how weak flow can appear at an emitter while the fitting connection remains intact. It helps distinguish flow-related symptoms from fitting failure.
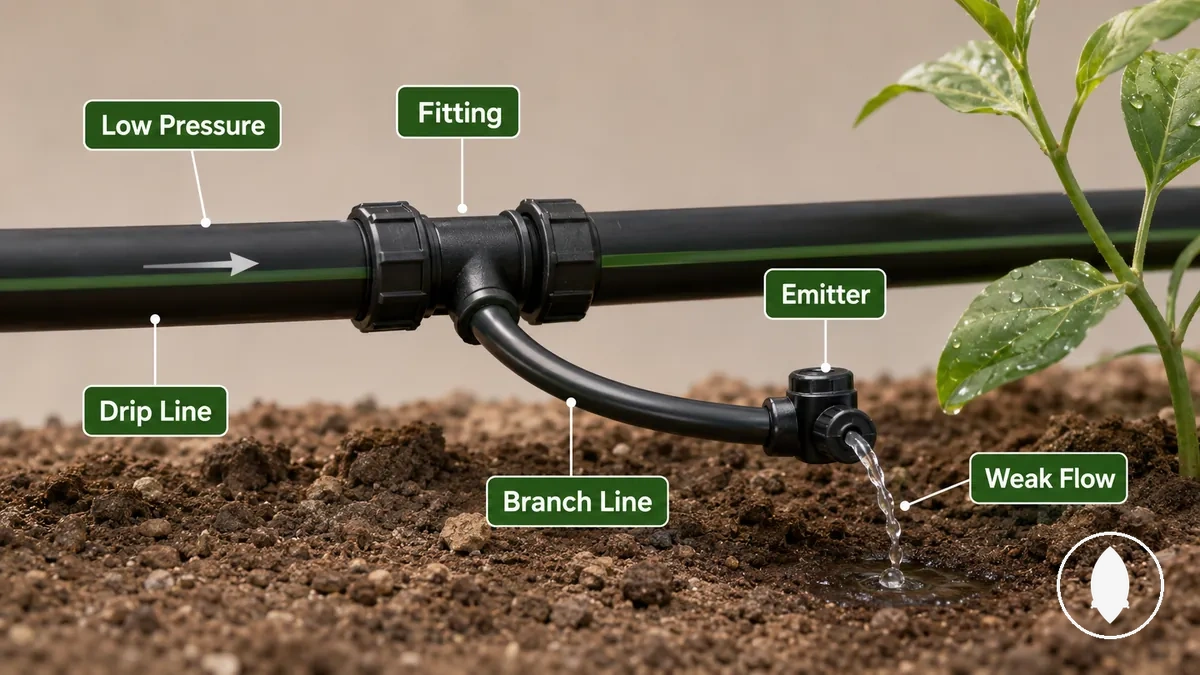
The following checklist helps separate weak flow from fitting failure:
- Check whether emitters produce weak flow or uneven flow along the branch line.
- Inspect emitters and the filter for clogging that may reduce water delivery.
- Consider whether long drip line runs or layout limits are reducing pressure near the end of the branch line.
- Compare the available water supply with the regulator setting if insufficient pressure is suspected.
Low pressure can exist alongside clogging, undersupply, or layout limits, so weak flow does not necessarily indicate a faulty fitting connection. Compare the overall flow pattern before treating the fitting itself as the primary cause.
Pressure Symptoms at Fitting Connections
Pressure symptoms should be assessed at the fitting connection because this is where leaks, pop-offs, spraying, and other visible signs are most likely to appear. These pressure symptoms can indicate that pressure is affecting the connection, although ordinary wear, poor insertion, or wrong-size tubing may produce similar warning signs.
Pressure Symptoms at Fitting Connections become easier to identify by examining the connector and the surrounding tubing before looking elsewhere in the drip line. The annotated illustration below highlights common connection-level signs, including leaks, spraying, a loosened joint, and stressed adapters. It helps distinguish pressure-related symptoms from other fitting issues without assuming a certain cause.
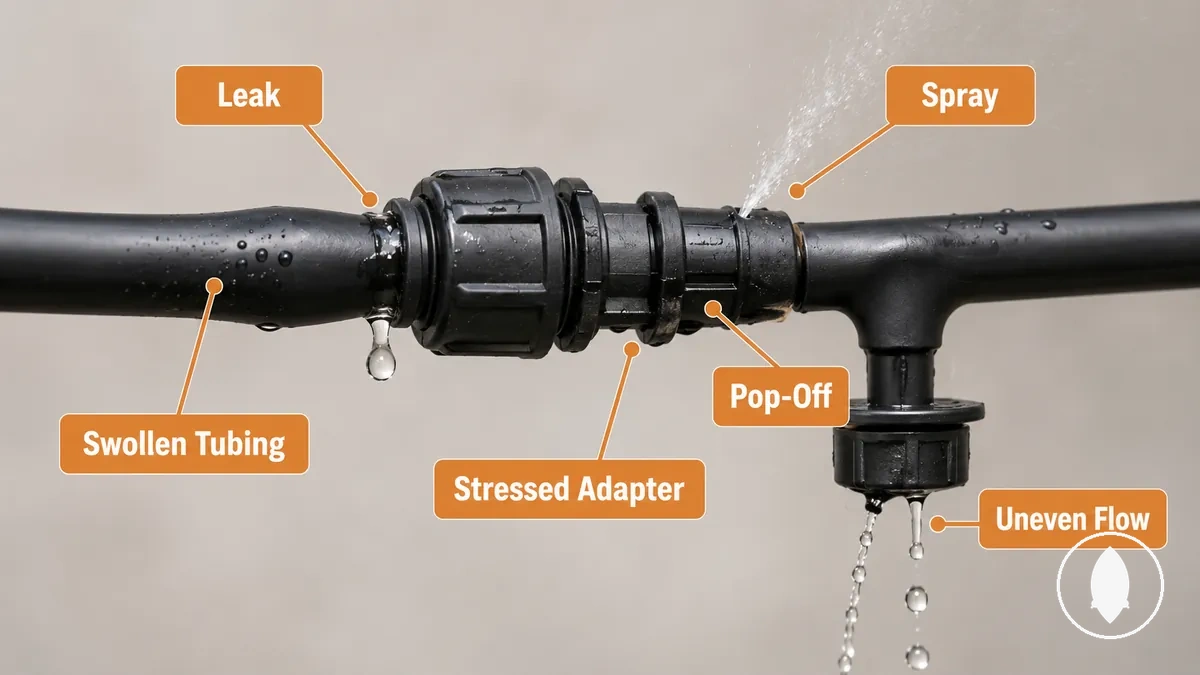
Visible symptoms help determine the next check rather than confirm a complete diagnosis. A leak at the fitting connection may indicate a pressure symptom or a sealing issue. Pop-offs can suggest high pressure, poor fit, or another connection problem, while spraying or uneven flow may point to a pressure imbalance around the emitter. Swollen tubing and stressed adapters can also indicate additional pressure load, but these signs should be interpreted together before moving to repair decisions.
Pressure Symptoms at Fitting Connections are easier to organize when each visible sign is matched with its possible pressure condition and the next check at the connection point.
- Leak: May indicate a pressure symptom or poor sealing. Next check: Inspect the fitting connection and tubing fit.
- Pop-off: May indicate high pressure or poor fit. Next check: Examine the connection point and tubing insertion.
- Spraying or uneven flow: May indicate a pressure imbalance near the emitter. Next check: Inspect the emitter and nearby fitting connection.
- Swollen tubing: May indicate added pressure load. Next check: Compare tubing condition around the fitting connection.
- Stressed adapters: May indicate repeated connection loading. Next check: Inspect the adapter and surrounding tubing for visible deformation.
Leaks at Connectors Under Pressure
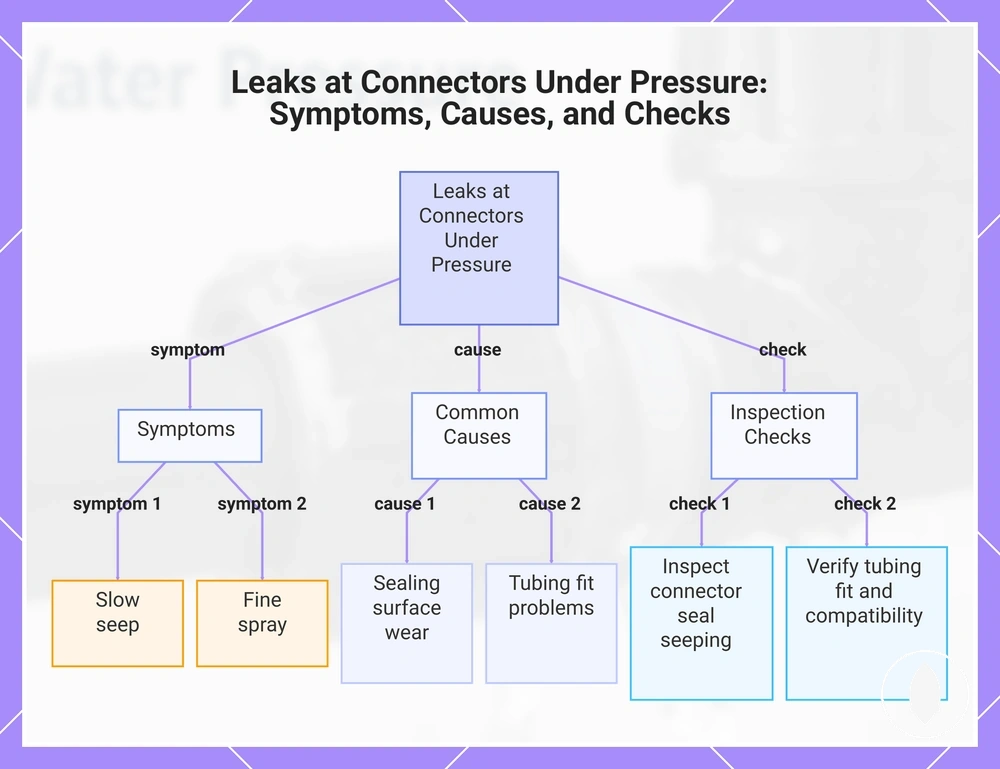
When drip irrigation fittings develop a leak under pressure, the connector seal, tubing fit, or connection point may be allowing water to seep or spray. Pressure can expose a weak sealing surface or an imperfect tubing fit, but a local inspection is needed before treating pressure as the only cause.
Different connectors may respond differently to line pressure depending on their sealing surface, tubing fit, and compatibility with the fitting connection. A slow seep may indicate a minor sealing issue, while a fine spray can suggest that pressure is escaping at the connection point. Worn connection points or poorly inserted tubing may create similar leak behavior even when pressure is not the only contributing condition.
A brief inspection helps identify where the leak begins before moving beyond the connector itself. Check these connection points first:
- Inspect the connector seal for seeping around the fitting connection.
- Check whether the tubing fit is fully inserted and compatible with the connector type.
- Look for spray developing at the connection point while the system is under pressure.
- Examine the sealing surface for wear or movement that may increase leak risk.
If these local checks suggest pressure is contributing to the leak, see leaks caused by pressure for broader diagnostic guidance without treating this subsection as a complete leak repair guide.
This chart shows the common symptoms, likely causes, and recommended inspection checks for leaks at drip irrigation connectors under pressure.
Fittings or Emitters Popping Off
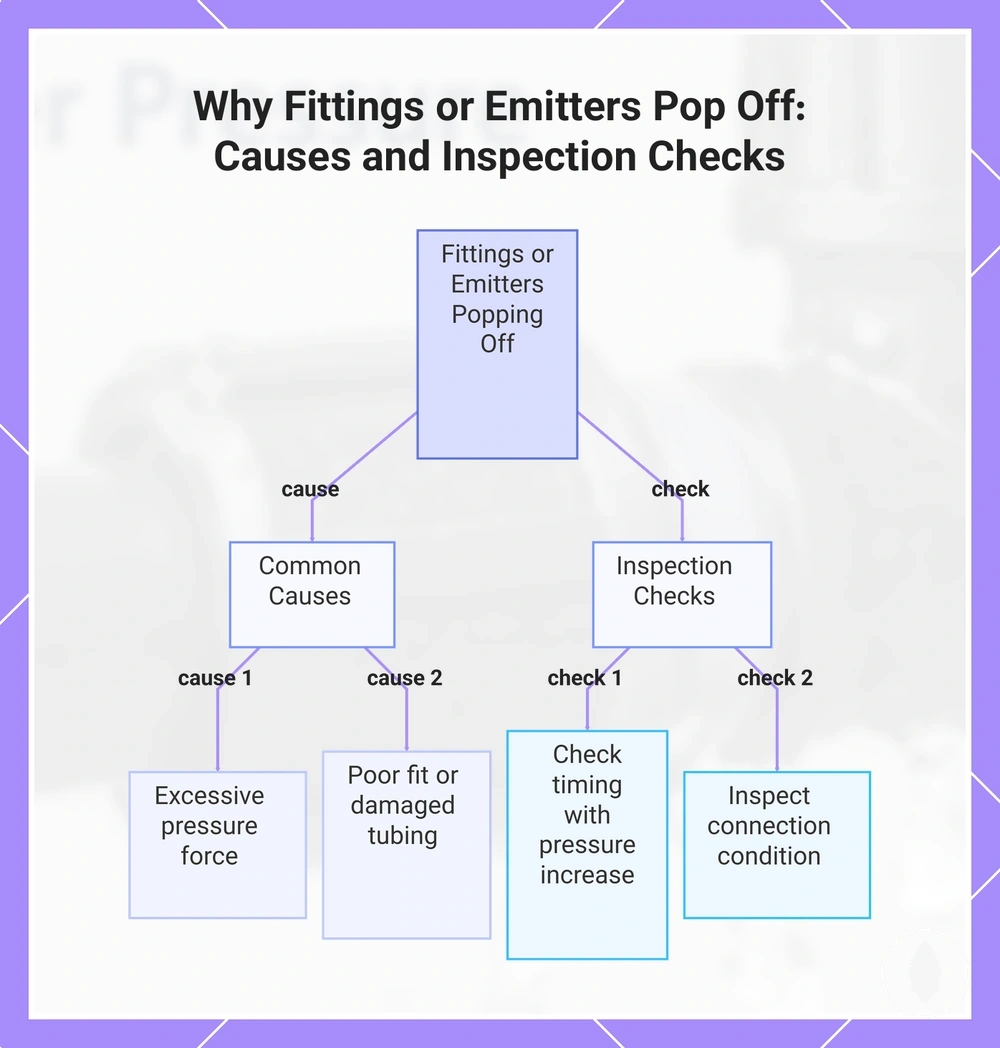
When fittings or emitters start popping off, pressure may be placing more force on the connection than the tubing can retain. Poor fit, a worn tubing hole, or damaged tubing can also reduce retention, so pressure should be assessed alongside these local conditions.
Retention depends on how securely the fitting or emitter is held within the tubing hole under operating pressure. A stretched tubing hole may reduce retention, while damaged tubing can further weaken the fitting connection. Different fitting styles may respond differently to pressure, so checking the connection condition is more reliable than assuming a single cause. A brief local inspection can help determine the next check without expanding into a full troubleshooting process.
Check the following points before moving beyond the fitting connection:
- Observe whether the fitting or emitter starts popping off only when pressure increases.
- Inspect the tubing hole for stretching, wear, or damage that may reduce retention.
- Confirm that the fitting style is appropriate for the tubing and fully inserted.
- Look for signs of poor fit or damaged tubing around the fitting connection.
Pop-offs may result from a combination of pressure, poor fit, and damaged tubing rather than a single condition. For broader troubleshooting, see popping-off fittings.
This chart shows the main causes of fittings or emitters popping off and the key inspection checks to diagnose the issue.
Spraying Drippers and Uneven Flow
When spraying drippers or uneven flow develop near fittings and emitters, a pressure imbalance may be affecting water delivery. These flow patterns can indicate changing pressure conditions, although clogging, branch line length, or emitter condition may also contribute to the symptom.
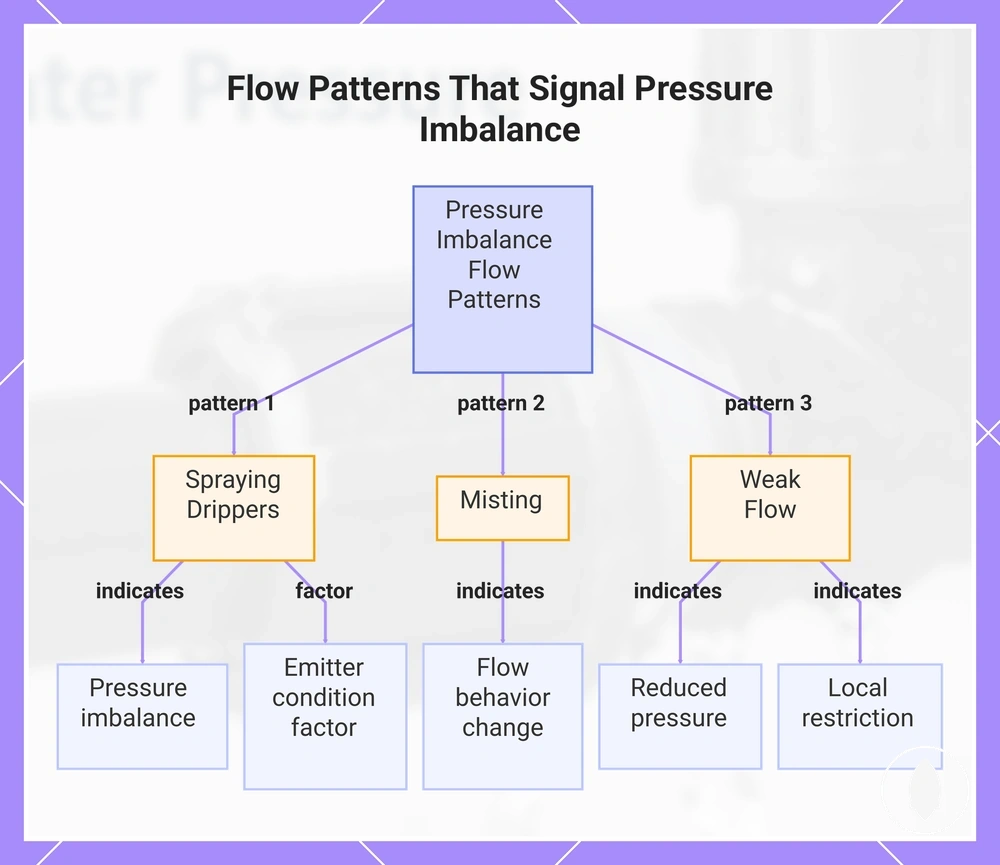
Pressure imbalance can change flow behavior along a branch line without affecting every emitter in the same way. Spraying drippers or misting may occur when water leaves the emitter as a fine spray, while weak flow may indicate reduced delivery. Uneven flow between nearby emitters can suggest changing pressure conditions, but local restrictions or emitter condition should also be considered before drawing a conclusion.
The following observations help distinguish common pressure-related flow patterns:
- Spraying drippers: May indicate pressure imbalance near the emitter or fitting connection.
- Misting: Fine spray from the emitter can suggest a change in flow behavior.
- Weak flow: May indicate reduced pressure or another local restriction affecting water delivery.
- Uneven flow: Compare nearby emitters on the same branch line to determine whether the pattern is isolated or repeated.
These flow patterns are useful diagnostic clues, but they should be interpreted together with pressure condition, tubing condition, and emitter condition rather than being treated as evidence of a single cause.
This chart shows three common flow patterns—spraying drippers, misting, and weak flow—and what they indicate about pressure imbalance in drip irrigation systems.
Pressure Rating and Tubing Compatibility
Pressure rating and tubing compatibility should be checked together before making a repair decision. A fitting type that works with one tubing size, wall strength, and connection method may not perform the same way with another combination under similar pressure conditions. Evaluating the complete fitting connection helps reduce failure risk before replacing individual parts.
Pressure rating describes the operating condition that compatible fittings and tubing are intended to handle, while tubing compatibility depends on how the fitting type, tubing size, wall strength, and connection method work together. A secure fitting connection in one tubing specification may not provide the same retention in another. If pressure-related symptoms such as leaks or pop-offs appear, compare the connected components before deciding which part requires attention.
Pressure rating only has practical meaning when it is considered alongside the matching tubing and connector type. The table below summarizes the main compatibility checks that can guide a repair decision.
| Compatibility factor | Why it matters | Possible failure risk | Repair decision |
|---|---|---|---|
| Fitting type | Should suit the intended connection method | Reduced retention or leaks | Confirm compatibility before replacement |
| Tubing size and wall strength | Influence how securely the fitting is retained | Loose fitting connection or pop-off | Compare tubing specifications before repair |
| Pressure rating | Should align with compatible tubing and fittings | Greater failure risk under pressure | Check the complete fitting assembly |
| Connection method | Affects sealing and retention | Leak or unstable fitting connection | Review fitting compatibility under pressure before making a repair decision |
Fitting Type and Tubing Strength
Fitting type and tubing strength should be evaluated together because connection retention depends on both parts of the fitting assembly. A barbed fitting or compression fitting may respond differently to pressure load depending on tubing strength, wall condition, grip, and overall compatibility rather than connector style alone.
Barbed fittings rely on grip between the fitting and the tubing, while compression fittings use a different connection method to secure the tubing. Neither fitting type is universally better because tubing strength, wall condition, and sizing influence how the fitting connection responds to pressure load. If the tubing wall condition has weakened or stretched, grip may decrease and failure risk can increase even when the fitting type is appropriate. Check the fitting connection and tubing condition together before deciding whether repair or replacement is needed.
The comparison below highlights how fitting type and tubing strength work together under pressure:
| Connection factor | Pressure-retention consideration |
|---|---|
| Barbed fittings | Grip depends on tubing strength, wall condition, and correct sizing. |
| Compression fittings | Connection method depends on compatible tubing and proper assembly to resist pressure load. |
Drip Tape, Micro Tubing, and Mainline Pressure Limits
Drip tape, micro tubing, and mainline tubing tolerate different pressure conditions at their fittings, so the line type should be verified before treating a fitting as the source of the problem. Pressure limits vary by line type and manufacturer limits, meaning the same pressure load can create different failure risk depending on the tubing and adapters in use.
Drip tape, micro tubing, and mainline tubing are designed for different operating conditions, making compatible adapters and fittings an important part of pressure management. A fitting connection that performs well on one line type may not perform the same way on another if pressure load, tubing condition, or manufacturer limits differ. Before replacing a fitting, check the line type, matching adapters, and manufacturer limits to determine whether the pressure boundary or the fitting connection is more likely contributing to the symptom.
The table below summarizes how line type influences pressure-related fitting risk.
| Line type | Pressure-limit consideration | Possible failure risk |
|---|---|---|
| Drip tape | Pressure limits depend on manufacturer limits and compatible adapters. | Failure risk may increase if pressure exceeds the intended operating condition. |
| Micro tubing | Pressure limits depend on tubing specification and fitting compatibility. | Leaks or connection movement may occur when pressure load exceeds suitable conditions. |
| Mainline tubing | Pressure limits vary with tubing design and manufacturer limits. | Failure risk depends on compatible fittings, adapters, and pressure load. |
Pressure Regulators Before Drip Irrigation Fittings
When repeated fitting failures occur, pressure regulators reduce pressure before it reaches downstream fittings when they are positioned correctly in the irrigation line. The level of protection depends on regulator position, system configuration, and the regulator's suitability for the pressure condition rather than on the regulator alone.
Regulator position determines which components receive reduced line pressure. In many systems, the pressure regulator is placed after the water source and before the filter, adapter, fitting, and downstream line so those connected components become the protected connection. If repeated leaks or connector pop-offs continue, confirm that the affected fitting connection is actually downstream of the regulator before assuming the fitting itself is responsible.
The placement sequence below shows how regulator position changes downstream pressure conditions.
| Connection order | Pressure condition | Protection outcome |
|---|---|---|
| Water source → Pressure regulator | Incoming pressure is reduced before entering the drip system. | Downstream fittings may receive lower pressure when the regulator is correctly positioned. |
| Pressure regulator → Filter | Filtered water continues through the regulated section of the line. | The filter and downstream fittings remain within the regulated pressure path. |
| Filter → Adapter → Fitting → Downstream line | Pressure at the fitting connection depends on regulator position and overall system configuration. | A correctly positioned regulator can help reduce pressure-related failure risk, although clogged filters, damaged tubing, or incompatible fittings may still contribute to connection problems. |
In tap-fed systems, raised-bed systems, or irrigation lines with repeated connector failures, evaluate the water source, regulator position, filter, adapter, and fitting connection together before concluding that pressure alone is causing the symptom.
Matching Regulator PSI to the System
Regulator PSI should match the drip line, fitting rating, and emitter requirement instead of a generic pressure preference. The appropriate output pressure depends on the weakest component in the irrigation system because that component can determine the pressure outcome at the fitting connection.
Matching regulator output to the system means comparing the regulator PSI with the drip line, fitting rating, and emitter requirement rather than relying on a single setting for every installation. If one component has a lower pressure tolerance than the others, it becomes the weakest component that should guide the decision. A mismatch may increase the likelihood of leaks, connector movement, or uneven emitter performance, while unnecessarily low output pressure may reduce water delivery. Verify the system components before changing the regulator setting.
Before selecting or adjusting a regulator PSI, verify the following:
- Confirm the drip line type and its intended operating conditions.
- Compare the regulator output pressure with the fitting rating.
- Check the emitter requirement so the selected output pressure suits the irrigation layout.
- Identify the weakest component because it may determine the appropriate pressure outcome.
Filter Regulator Kits and Connection Points
Filter regulator kits combine debris control and pressure control before water reaches drip irrigation fittings when they are positioned correctly in the connection path. Whether the fittings receive both benefits depends on the placement of the filter regulator kit, not simply on using one.
Connection points determine how the filter, regulator, adapter, tubing connector, and fitting work together. The filter helps reduce debris reaching the fitting connection, while the regulator manages line pressure before it reaches downstream components. This combination may help reduce clog-related flow issues and pressure-related stress, but filtration does not replace pressure compatibility between the drip line, fittings, and other connected components. Check the connection order before treating the filter regulator kit as the solution to every pressure or flow symptom.
Verify the connection order before evaluating fitting performance:
- Water source → Filter regulator kit
- Filter → Regulator
- Regulator → Adapter
- Adapter → Tubing connector
- Tubing connector → Fitting
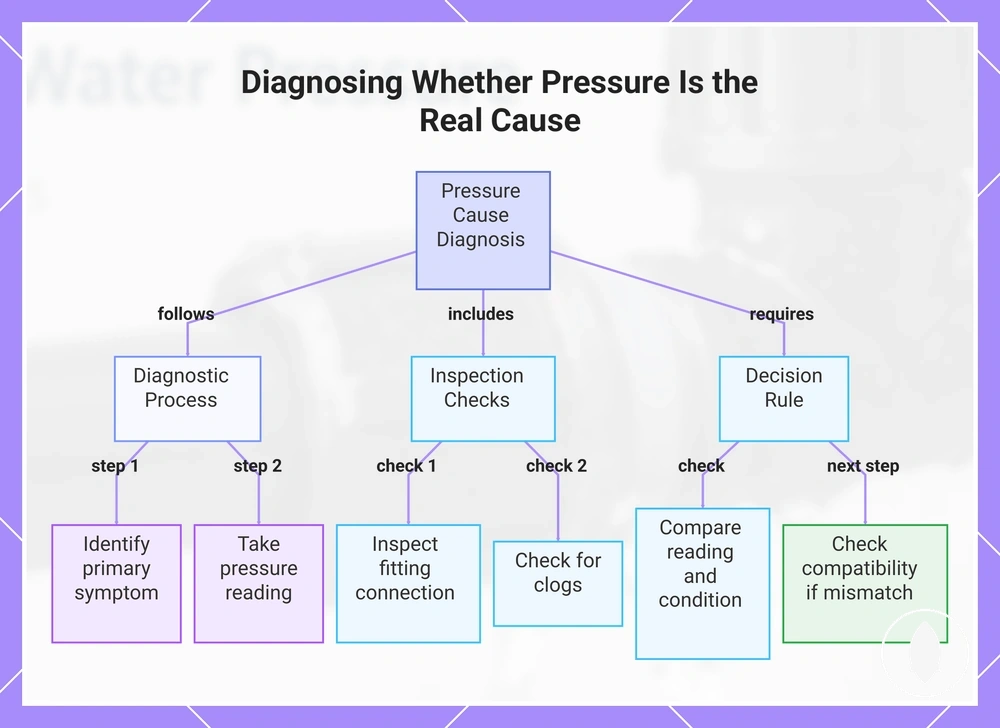
Diagnosing Whether Pressure Is the Real Cause
Pressure diagnosis should confirm that pressure is the cause before replacing fittings or changing other components. Similar symptoms can result from pressure, poor fit, clogs, or installation errors, so a single symptom is not enough to identify the problem. Compare the pressure reading with the connection condition before making a repair decision.
Start by identifying the primary symptom, then take a pressure reading at an appropriate measurement point in the irrigation line. Compare that reading with the condition of the fitting connection, tubing, and nearby components instead of relying on appearance alone. A poor fit, clogs, or installation errors may produce symptoms that resemble pressure-related problems even when line pressure is not the primary cause. Make the decision only after the pressure reading and connection condition support the same conclusion.
Use the following checklist to confirm whether pressure is the likely cause:
- Identify the primary symptom before changing any fittings or components.
- Take a pressure reading at the selected measurement point.
- Inspect the fitting connection for poor fit, tubing condition, or visible installation errors.
- Check for clogs that may affect water flow independently of pressure.
- Compare the pressure reading with the connection condition before deciding whether pressure is the likely cause.
If the pressure reading and the connection condition point to different causes, continue checking compatibility or maintenance-related issues before replacing fittings or adjusting the system.
This chart outlines the diagnostic steps to confirm if pressure is the root cause of irrigation issues, including symptom identification, inspections, and the decision rule.
Measuring Pressure at the Tap and Drip Line
Measuring pressure at the tap and drip line helps confirm where pressure changes occur before replacing fittings or making other adjustments. A pressure gauge provides useful evidence when pressure readings are taken at multiple measurement points instead of a single location. Interpret each pressure reading alongside the fitting and tubing ratings because the same reading may have different meanings across different system configurations.
Compare pressure readings from the source to the fitting area to identify where line pressure changes. Readings at the tap, regulator outlet, mainline, branch line, and fitting area can differ depending on regulator position, connection condition, and the irrigation layout. A change at one measurement point does not necessarily mean the fitting connection is the cause, so compare the pressure reading with visible symptoms before deciding on the next diagnostic check. Pressure readings should be interpreted against compatible fitting and tubing ratings rather than in isolation.
Use the following sequence to gather pressure evidence:
- Measure at the tap to establish the initial pressure reading.
- Measure at the regulator outlet to compare the regulated pressure reading.
- Measure along the mainline to identify changes before branch connections.
- Measure at the branch line to compare local pressure conditions.
- Measure near the fitting area, then compare the pressure reading with the fitting connection and tubing condition before making the next diagnostic decision.
Separating Pressure from Fit, Clogs, and Installation Problems
The same fitting symptom can result from different causes, so pressure should be distinguished from fit, clogs, and installation problems before replacing components. Compare the pressure condition with the tubing fit, fitting connection, and visible installation condition to identify the most likely cause instead of assuming pressure is responsible.
Use the following checklist to separate common causes before making a diagnostic decision:
- Pressure: The symptom appears alongside a change in line pressure. Check: Compare the pressure condition with the fitting connection. Meaning: Pressure may be the likely cause when the tubing fit and installation condition appear suitable.
- Tubing fit: A loose or inconsistent tubing fit is visible. Check: Inspect the tubing joint and fitting connection. Meaning: Poor fit may explain the symptom even when pressure appears appropriate.
- Clogs: Flow changes occur at a single location. Check: Compare nearby drip connectors for similar flow. Meaning: A local clog may be a more likely cause than pressure.
- Insertion quality: The fitting is not fully inserted. Check: Inspect insertion quality at the fitting connection. Meaning: Incomplete insertion may create symptoms similar to pressure-related problems.
- Installation problems: The tubing shows twisting or installation stress. Check: Examine the tubing path around the fitting. Meaning: Mechanical stress may be the primary cause instead of pressure.
If the symptom is limited to one fitting while nearby connections remain unchanged, suspect a local fit, clog, or installation problem before identifying pressure as the likely cause. If similar symptoms appear across multiple fitting areas, continue checking the pressure condition together with fitting and tubing compatibility.
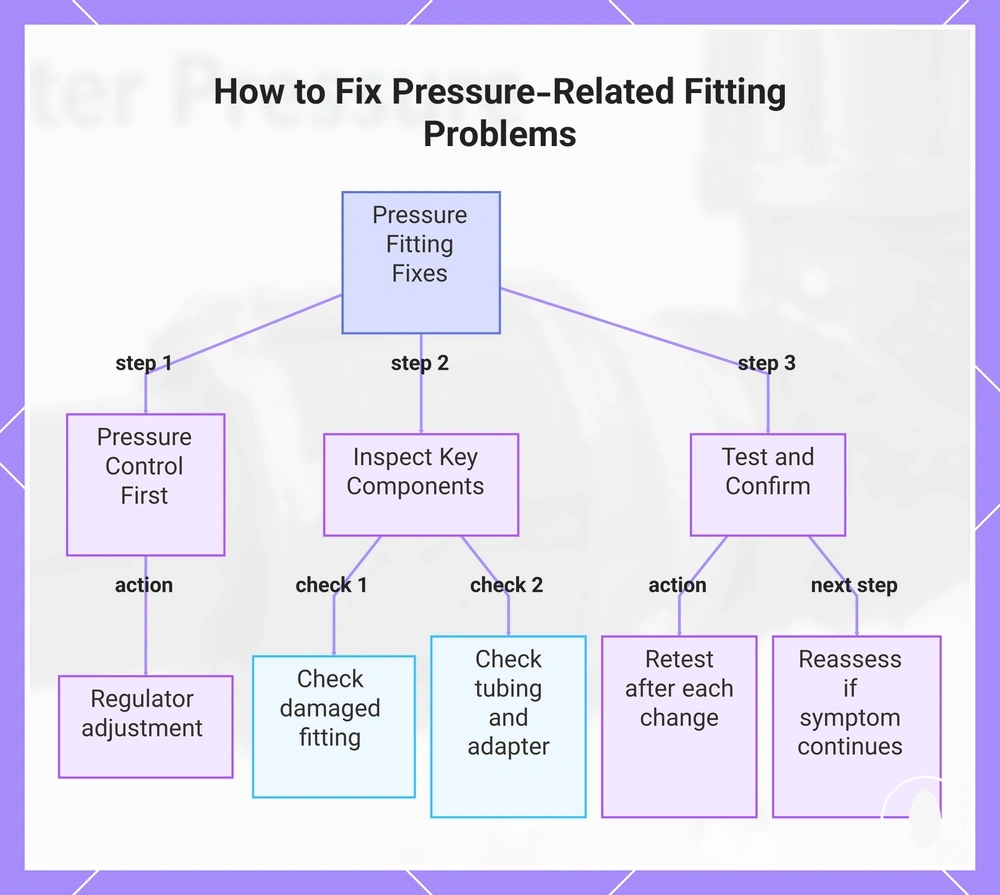
Fixes for Pressure-Related Fitting Problems
When pressure has been confirmed as the likely cause, pressure-related fixes should begin with pressure control before replacing fittings. Regulator adjustment is usually the first decision because excessive pressure can continue affecting the fitting connection even after damaged components are replaced. The repair outcome depends on the condition of the fitting, tubing, adapters, and overall compatibility.
Select the repair according to the confirmed cause rather than replacing components immediately. If excessive pressure is present, perform regulator adjustment before inspecting individual fittings. If pressure appears suitable but the symptom remains, check for a damaged fitting, poor tubing condition, or an adapter mismatch that may affect the fitting connection. Retest the connection after each change to determine whether the repair outcome has improved before moving to another action.
After pressure has been confirmed, use the following checklist to guide the repair decision:
- Address excessive pressure with regulator adjustment when pressure is the confirmed cause.
- Inspect the damaged fitting and replace it only if its condition may no longer provide a reliable fitting connection.
- Check the tubing condition for wear, stretching, or damage that may reduce sealing or retention.
- Confirm that no adapter mismatch is affecting compatibility between connected components.
- Retest the fitting connection and evaluate the repair outcome before making additional changes.
If the symptom continues after pressure control and local component checks, reassess the fitting connection and compatibility conditions before replacing additional parts.
This chart outlines the step-by-step process for diagnosing and repairing pressure-related fitting issues, starting with pressure control and moving through component inspection and testing.
Reduce Excess Pressure Before Replacing Fittings
Reduce pressure before replacing fittings when pressure has been identified as the likely cause of the problem. Shut off the water source, check pressure, regulate the line if needed, and retest the fitting connection before deciding that the fitting itself has failed. A damaged or incompatible fitting may still require repair even after pressure has been reduced.
Use the following action order to confirm whether pressure reduction changes the symptom before replacing components:
- Shut off the water source before making any adjustment to the fitting connection.
- Check pressure and compare the pressure reading with the condition of the fitting connection.
- Regulate the line when excessive pressure appears to be contributing to the symptom.
- Restore the water source and retest the fitting connection to determine whether the symptom changes.
- If the symptom remains after pressure has been reduced, inspect the fitting connection for damage, poor fit, tubing condition, or an adapter mismatch before deciding to replace the fitting.
If the retest result does not show improvement, continue checking the fitting connection and component compatibility before replacing additional parts.
Repair or Replace Fittings That Will Not Hold
Repair a pressure-affected fitting only after line pressure has been controlled and the fitting connection has been inspected. Reseat the fitting when retention quality remains acceptable and the connection was not fully engaged, but replace it if a worn fitting or damaged tubing no longer supports a reliable connection. The replacement decision should depend on fitting condition, tubing condition, and pressure history rather than pressure alone.
Inspect the fitting and tubing before deciding whether repair or replacement is appropriate. Use the following checklist to evaluate the connection after pressure has been reduced:
- Reseat the pressure-affected fitting if the fitting connection appears secure but was not fully engaged.
- Repair or replace a worn fitting when wear, deformation, or looseness may reduce retention quality.
- Inspect for damaged tubing, including cracks, stretching, or a weakened tubing joint that may prevent a dependable fitting connection.
- Consider the system's pressure history if repeated pressure events may have affected retention quality over time.
- Choose replacement only when the fitting condition or retention quality remains unsuitable after reseating and inspection.
If recurring failures continue after repair or replacement, inspect nearby tubing and connected components instead of focusing on a single fitting. For broader follow-up, review maintenance checks for pressure issues to determine whether repeated fitting problems indicate a wider maintenance need.