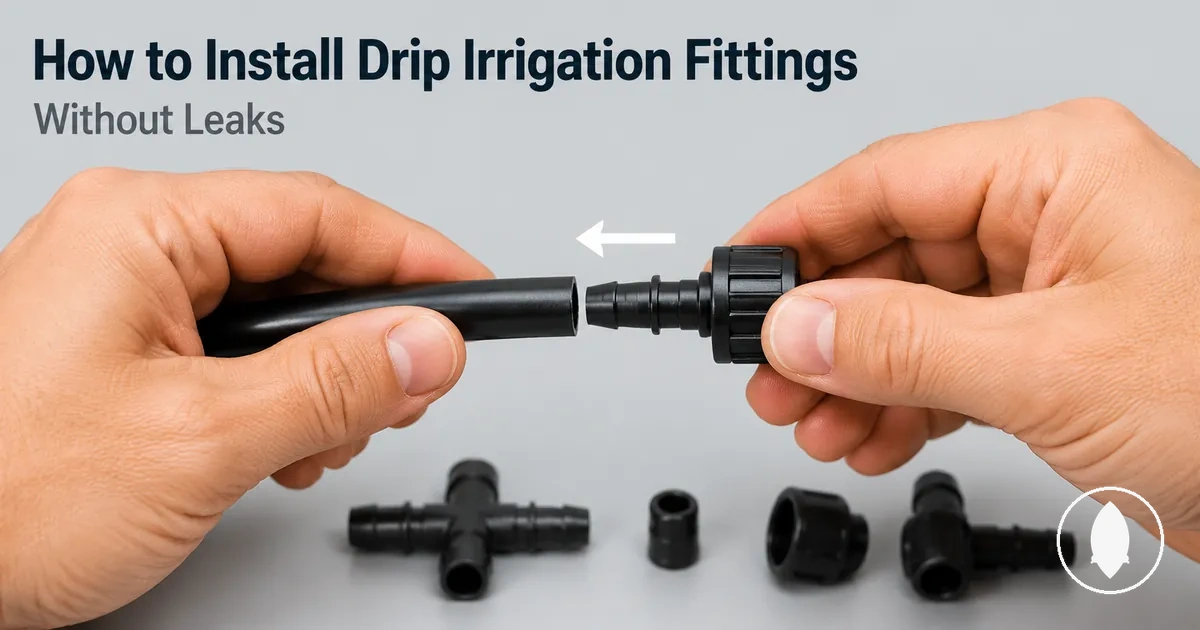
Drip Irrigation Fittings Leaking: Causes, Checks, and Repairs
When drip irrigation fittings are leaking, the leak location usually points to a fit, hole condition, seating, seal condition, or pressure issue rather than to the fitting category itself. The first check is where water escapes: around the tubing, at the connector, from a plug or end cap, or near a threaded connection. Identifying the leak location first helps determine the most appropriate repair path.
A leak between the tubing and connector may occur when the tubing is not fully seated, the hole edge is stretched or irregular, the connector does not match the tubing correctly, or the sealing surface has worn over time. A threaded connection may also leak if the seal is damaged or the connection is not seated evenly. Pressure can expose an existing weak connection, so the same symptom may have different causes depending on the fitting style, tubing condition, and operating pressure.
A repair should match the leak point rather than the symptom alone. A damaged hole may require a plug before creating a new connection, while a cut section of tubing may be better suited to a repair coupling. If the leak comes from an end cap or another fitting, checking the seal, connection, and tubing condition before replacing parts can help confirm whether the repair has addressed the actual cause.
Where Drip Irrigation Fittings Usually Leak
When a drip irrigation fitting leaks, the leak location is often the clearest clue to the likely cause. Water escaping around the tubing, from a connector, through a punched hole, or at a threaded join can indicate different conditions that should be checked before choosing a repair. Identifying the visible leak point first helps narrow the diagnosis.
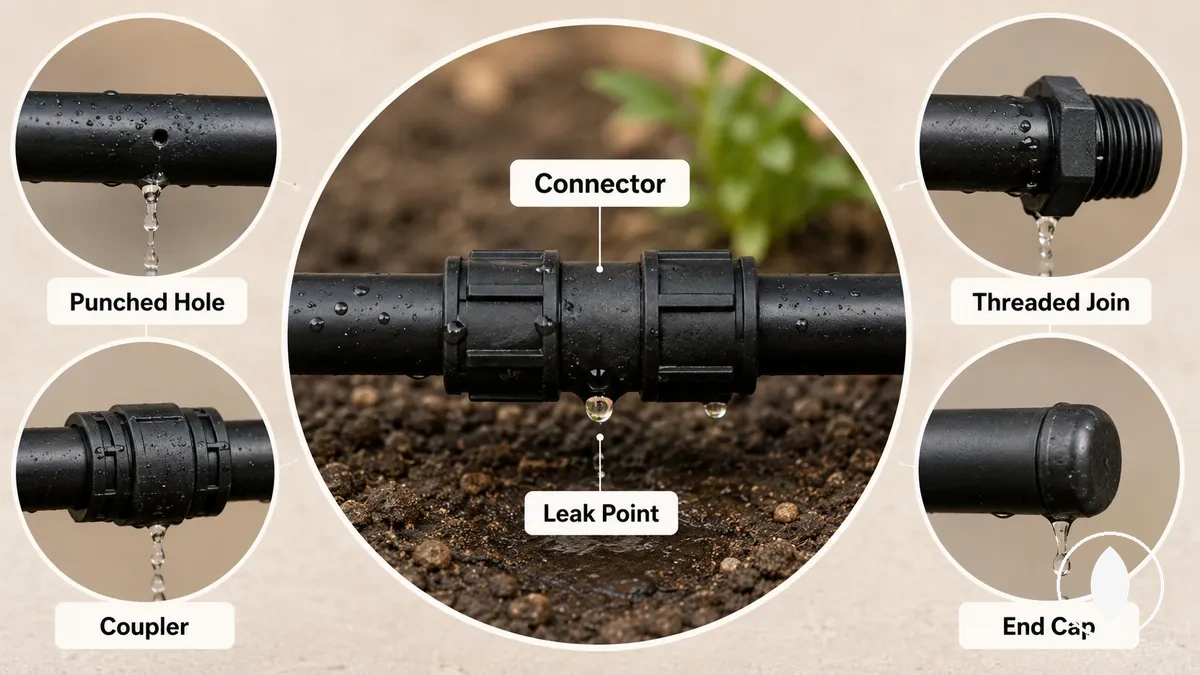
Leak symptoms can vary by connection type. A slow seep around a punched hole may indicate an irregular hole edge or a loose connector, while dripping from a coupler may suggest incomplete tubing insertion or a weakened seal. Spraying water can occur when pressure escapes through a larger opening, and water escaping from the wrong side of a threaded connection may indicate a sealing or thread-related issue. The visible symptom should be considered together with the fitting style, tubing condition, seal condition, and operating pressure before selecting a repair.
Use the leak locations below to organise the initial inspection before moving to repair decisions.
- Connector to tubing: Check whether water escapes around the connector instead of remaining sealed against the tubing.
- Punched hole: Look for seepage around the hole edge, especially if the fitting has been removed or repositioned.
- Coupler: Watch for dripping where two tubing sections join.
- Plug or end cap: Check for water escaping from the end of the line rather than remaining contained.
- Threaded join: Look for leakage around the connection instead of through the intended water path.
After identifying the leak point, compare the connection type with the information in the drip irrigation fittings hub before deciding on an appropriate repair.
Leaks at Tubing Holes and Connector Points
When a leak appears around a tubing hole or connector point, the seal between the tubing wall and the inserted fitting has often weakened. The cause may relate to the hole condition, connector diameter, insertion depth, or tubing stretch rather than the fitting alone. The main diagnostic task is identifying which local condition is allowing water to escape.
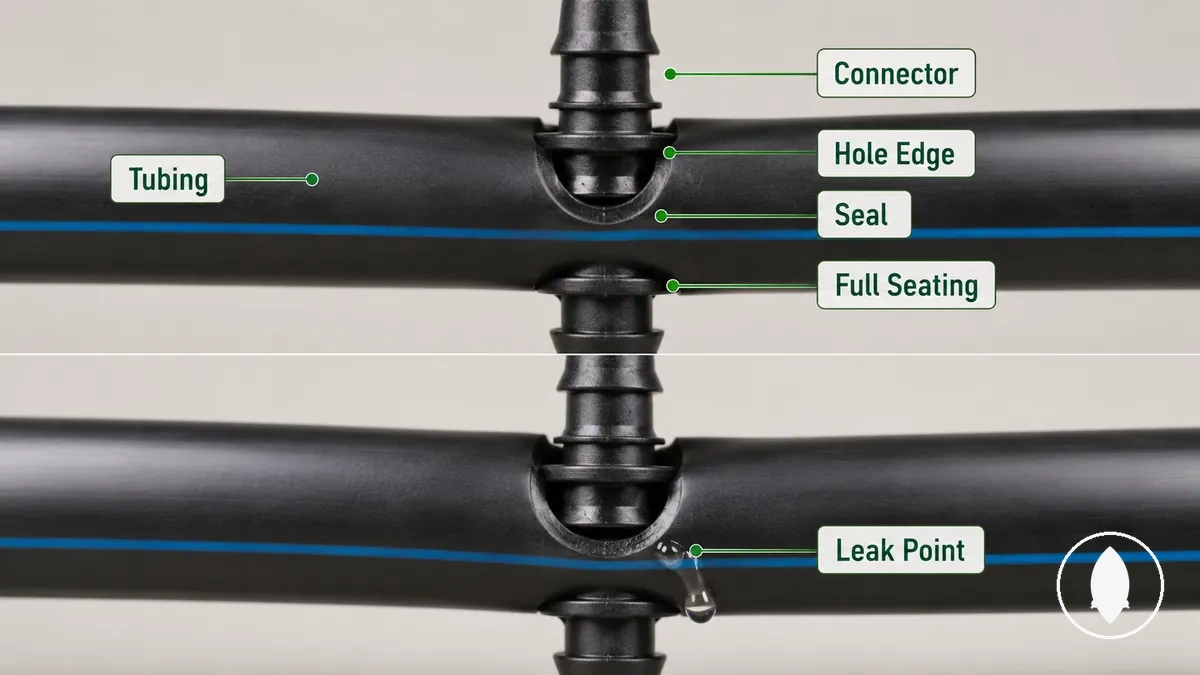
Inspect the tubing and connector together before choosing a repair. An irregular or stretched hole edge may no longer seal closely around the fitting, while a connector that is not fully seated can leave a small gap where water escapes. Tubing that has expanded with use may also reduce sealing contact, even when the connector appears undamaged. Comparing the leak pattern with the hole condition and connector fit helps narrow the likely cause.
- Hole condition: Look for stretched, torn, or uneven edges that may weaken the seal.
- Connector diameter: Check that the connector matches the tubing without appearing excessively loose or forced.
- Fitting seating: Confirm the connector is fully inserted into the tubing.
- Tubing stretch: Check whether the tubing has widened enough to reduce sealing contact.
- Water escape pattern: Seepage often suggests a sealing issue, while spraying may indicate a larger opening or a poorer connection.
Leaks Around Couplers and Repair Connections
When a leak appears around a coupler or repair connection, the repaired join often has a fit, cut, or seating problem that prevents the tubing from sealing properly around the fitting. The cause may relate to the tubing ends, coupler depth, tubing roundness, or connection tension rather than the repair fitting itself. The main diagnostic task is identifying which part of the repaired joint is allowing water to escape.
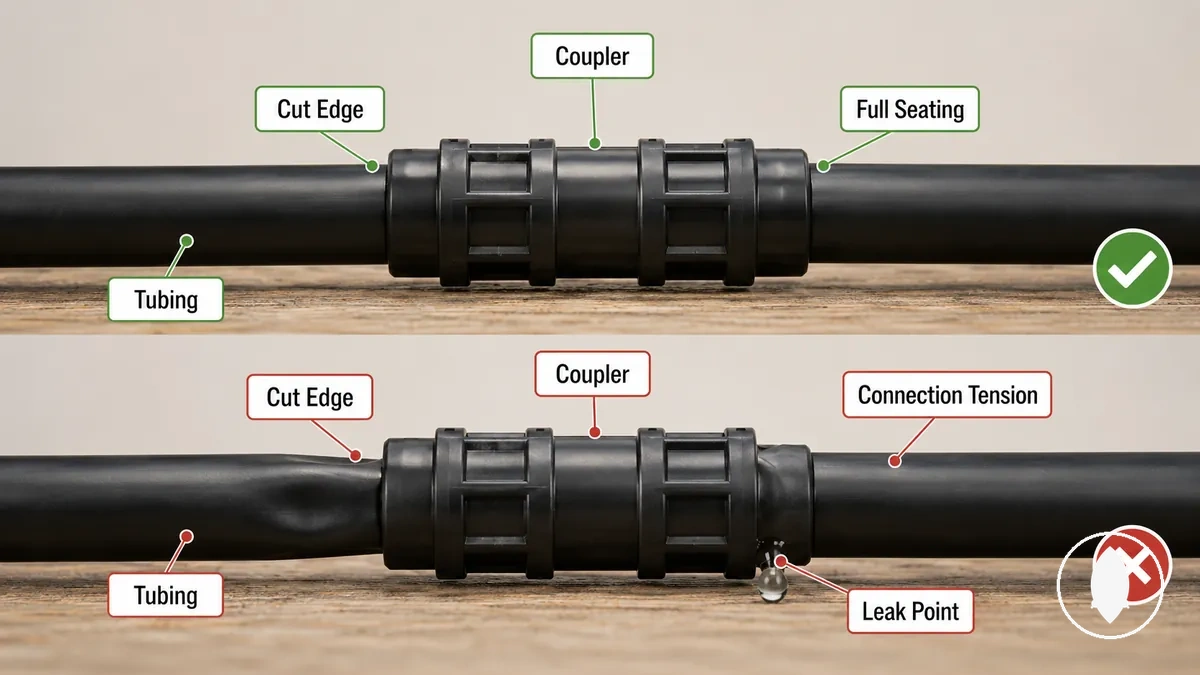
Inspect both tubing ends before deciding on a repair. A clean, square cut may seat more evenly than a rough or angled cut, while tubing that has become flattened or stretched may reduce sealing contact with the coupler. The connector should be fully inserted into both tubing ends without a visible gap, and tension from bending, twisting, or pulling on the repaired section may contribute to the leak by disturbing the seal.
- Cut quality: Check that both tubing ends are clean and square.
- Tubing roundness: Look for flattened or distorted tubing that may reduce sealing contact.
- Coupler depth: Confirm the coupler is fully seated into both tubing ends.
- Connection tension: Check whether the repaired section is under bending, twisting, or pulling that may contribute to the leak.
Leaks at Plugs, End Caps, and Threaded Joins
When a leak appears at the end of a drip irrigation line, the sealing point is often the plug, end cap, threaded join, washer, or folded tubing end rather than the tubing itself. A loose seal, damaged thread, worn washer, or deformed tubing may allow water to escape. The main diagnostic task is identifying which terminal sealing surface is no longer sealing correctly.
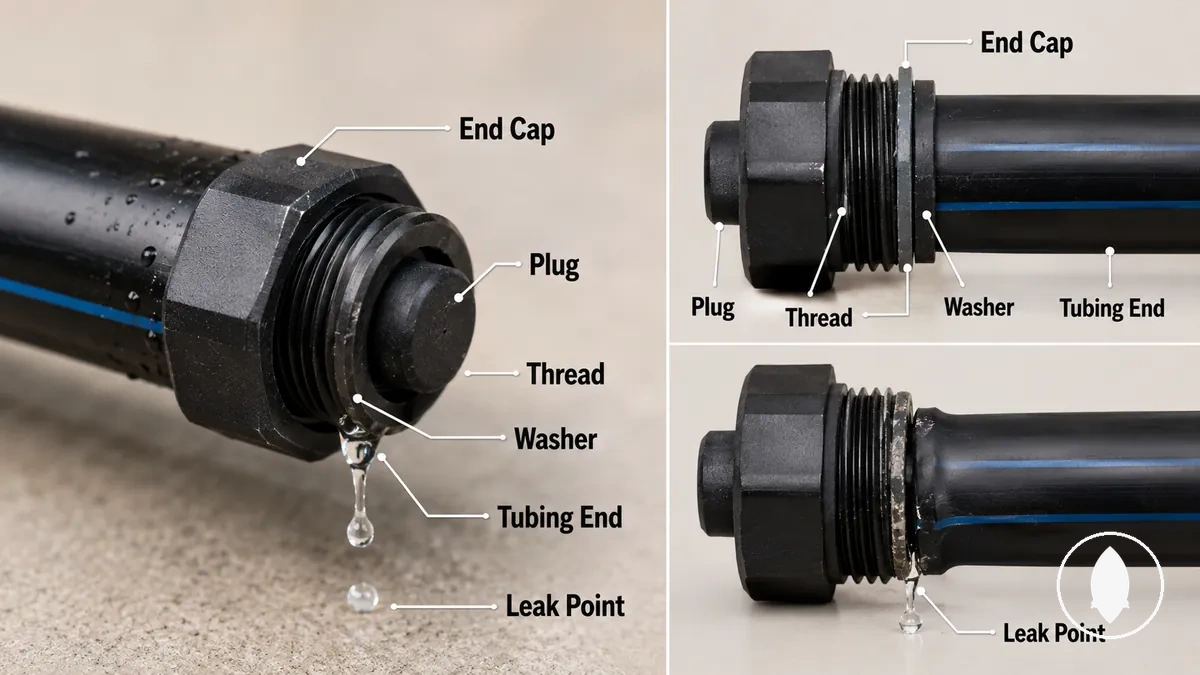
Terminal seals control how water is retained at the end of the irrigation line. Inspect the sealing components together before deciding on a repair because more than one local condition may contribute to the same leak symptom. Use the checklist below to organise the inspection.
- End cap tightness: Check whether the end cap is seated securely without obvious movement.
- Plug fit: Confirm the plug fits the tubing closely and does not appear loose.
- Thread condition: Look for damaged, crossed, or worn threads that may reduce sealing contact.
- Washer condition: Inspect the washer for wear, distortion, or damage that may affect the seal.
- Tubing deformation: Check whether the tubing end has stretched, flattened, or folded in a way that may prevent consistent sealing.
Why Drip Irrigation Fittings Leak
When a drip irrigation fitting leaks, the visible symptom often points to a specific cause rather than a single problem. A poor fit, damaged tubing, an irregular hole, incomplete insertion, a worn sealing surface, or system pressure may each create a different leak path. The main diagnostic task is matching the leak symptom to the most likely cause before choosing a repair.
Check the connection before assuming pressure is responsible. A fitting that does not suit the tubing, a stretched or uneven hole, or a connector that is not fully inserted may allow water to escape even under normal operating conditions. Pressure can make a weak connection more noticeable, but the underlying cause often relates to fit, hole quality, insertion depth, or seal condition. A fitting defect, an installation error, and a system-condition problem can produce similar symptoms, so the connection should be assessed as a whole before selecting a repair.
The table below groups common causes by what to inspect first and the repair direction they may suggest.
| Likely Cause | What to Check | Possible Repair Direction |
|---|---|---|
| Incorrect fitting size or fit | How the fitting seals against the tubing | Confirm the fitting matches the tubing and reseat it if required. |
| Poor hole quality | Hole edge for stretching, tearing, or uneven shape | Repair or replace the damaged connection point where appropriate. |
| Incomplete insertion | Insertion depth and connector seating | Fully seat the fitting if the connection is incomplete. |
| Worn sealing surface | Seal, washer, or thread condition | Replace worn sealing components or correct the connection. |
| Pressure exposing a weak connection | Whether the leak appears where fit or seal quality is already reduced | Correct the weak connection before treating pressure as the primary cause. |
Incorrect Tubing and Fitting Size Match
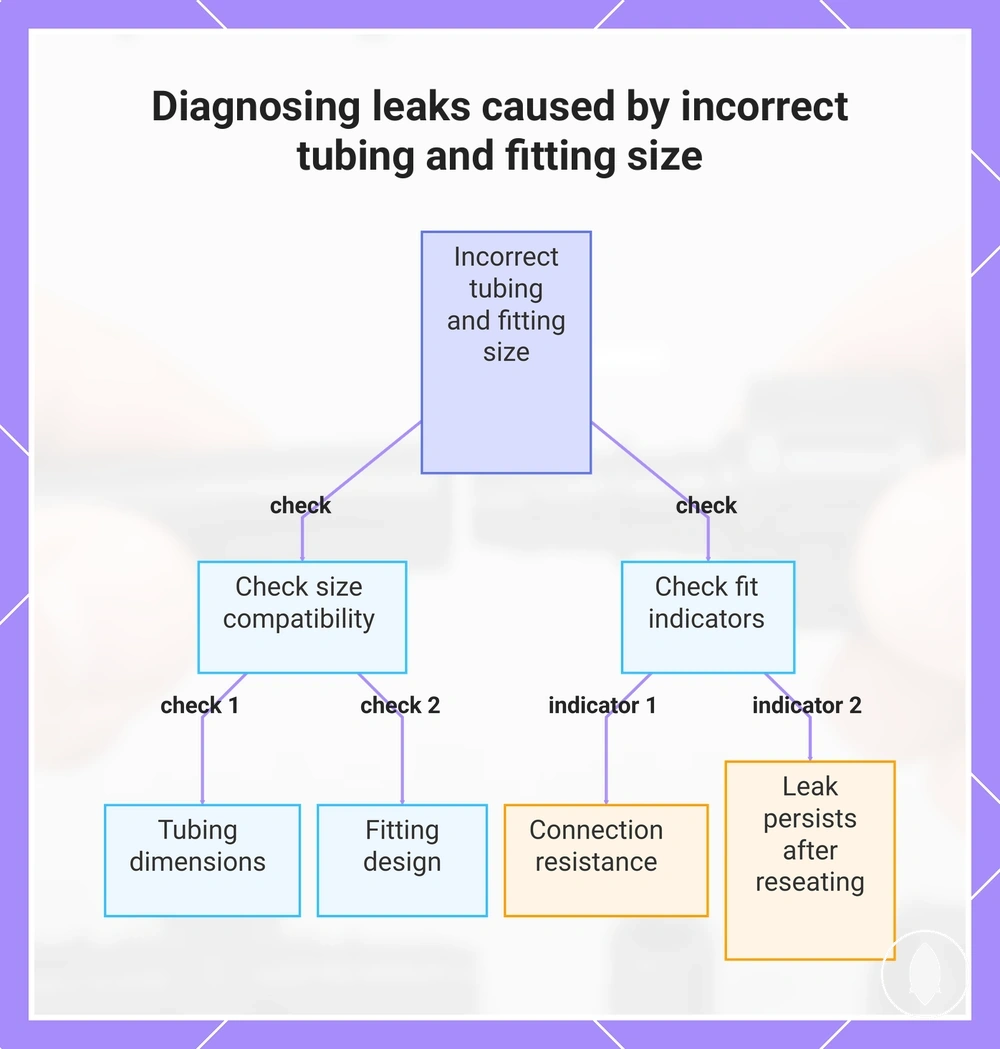
Incorrect tubing size and fitting size can cause a leak even when the connector appears to connect correctly. Compatibility depends on the tubing's inside diameter, outside diameter, and fitting style rather than appearance alone. The main decision is whether the leak is caused by a size mismatch instead of a seating or seal problem.
Tubing dimensions and fitting design should be assessed together because a connector that feels unusually loose or difficult to insert may not achieve a reliable fit. The checklist below organises the main compatibility criteria before deciding whether the connection needs further repair or replacement.
- Tubing size: Check that the inside diameter and outside diameter suit the intended connector.
- Fitting size: Confirm the fitting is designed for the tubing being used.
- Connection resistance: A connector that is excessively loose or unusually difficult to insert may indicate an unsuitable fit.
- Leak behavior: A leak that remains after careful reseating may indicate a compatibility issue rather than an insertion problem.
If the leak continues after reseating the connector, review poor fit and tubing compatibility before deciding whether a different tubing size or fitting size is required.
This chart shows the main checks to determine if a leak is caused by a tubing and fitting size mismatch.
Rough, Stretched, or Misplaced Tubing Holes
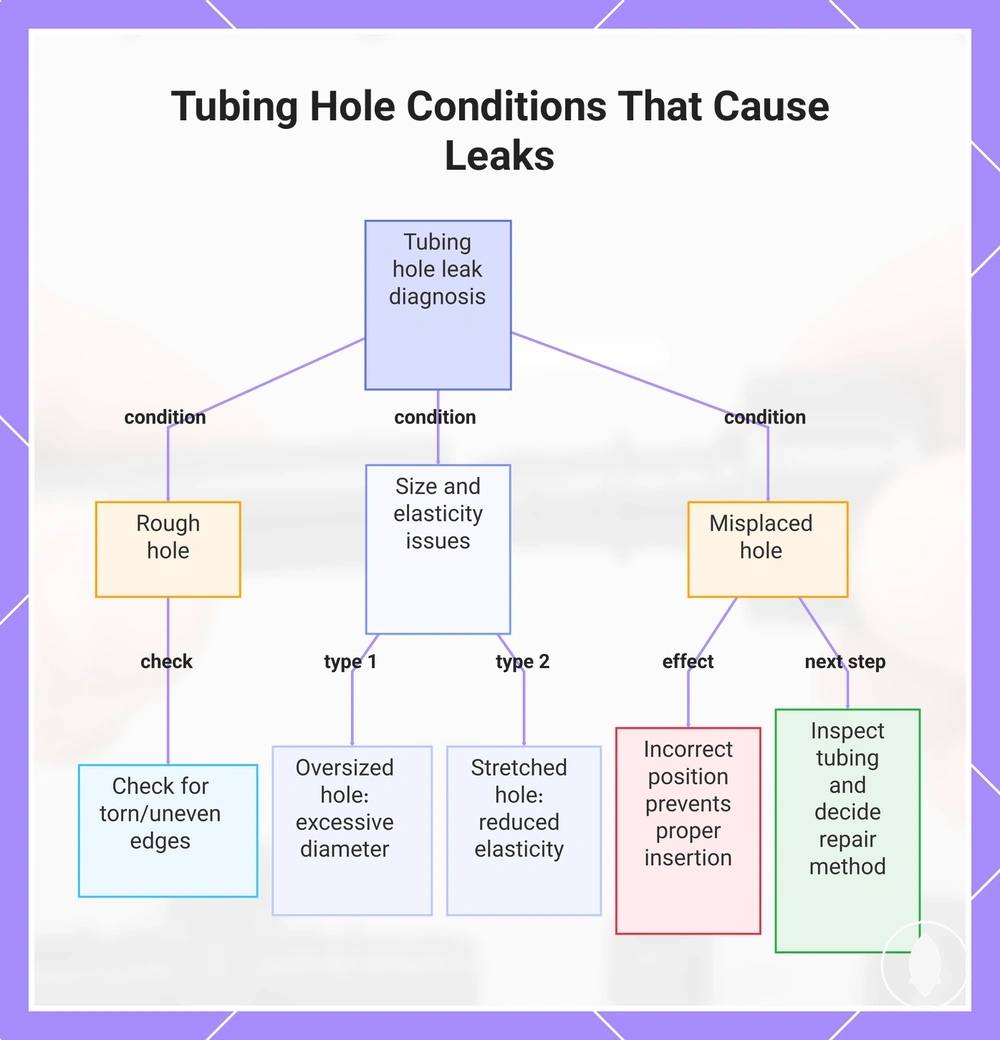
When a leak forms around an inserted connector, the hole is often the cause rather than the connector itself. A rough, stretched, oversized, or misplaced hole may prevent the connector from sealing against the tubing wall, allowing water to escape. The main diagnostic task is deciding whether hole condition is preventing a reliable fit.
Hole diameter, edge condition, tubing elasticity, and connector seal pressure all influence how well the connection seals. The checklist below groups the most common hole conditions before choosing a repair. Not every damaged hole can be corrected with a plug because more extensive damage may require cutting out the affected tubing and installing a repair coupling.
- Rough hole: Check for torn or uneven edges that may interrupt the seal around the connector.
- Oversized hole: A hole with excessive diameter may reduce connector fit and allow water to escape after insertion.
- Stretched hole: Reduced tubing elasticity may lower seal pressure and weaken the connection.
- Misplaced hole: An incorrectly positioned hole may prevent proper insertion or create a persistent leak point.
If the leak remains after reseating the connector, inspect the surrounding tubing before deciding whether a plug, repair coupling, or replacement of the damaged section is the more appropriate repair.
This chart shows the three main types of tubing hole conditions—rough, size/elasticity issues, and misplaced—and the checks to identify them, plus the repair decision step.
Incomplete Insertion or Poor Seating
Incomplete insertion or poor seating can make a new fitting leak because a partially inserted connector may not create a complete sealing surface against the tubing. The connection depends on adequate insertion depth, correct seating, and proper contact at the fitting shoulder. The main diagnostic task is determining whether the leak is caused by incomplete seating rather than another connection problem.
Seating depth directly affects leak risk because a visible gap or partial insertion can reduce the seal around the connector. With the pressure off, inspect the connection before considering other causes. The checklist below organises the main seating checks that help identify whether insertion is the likely cause of the leak.
- Insertion depth: Check that the connector is fully inserted into the tubing.
- Fitting shoulder: Confirm the tubing reaches the fitting shoulder where the fitting design requires it.
- Tubing resistance: Smooth, consistent resistance during insertion may indicate normal seating, while unusual resistance may justify further inspection.
- Visible gaps: Look for any space between the tubing and fitting that may indicate incomplete seating and a potential leak path.
If seating appears correct but the leak remains, review installation steps that prevent leaks before investigating other tubing or fitting conditions.
Damaged Threads, Washers, or Sealing Surfaces
Damaged threads, washers, or sealing surfaces can cause a leak even when the fitting size and placement are correct. The connector may not create a reliable seal if the threads are misaligned, the washer is worn, or the sealing surface has visible damage. The main diagnostic task is identifying which sealing component is creating the leak path.
Inspect the sealing components together because more than one condition may contribute to the same leak symptom. The checklist below organises the main inspection points for thread alignment, washer compression, surface cleanliness, and visible wear before deciding on a repair. Avoid excessive tightening because it may increase damage to the threads or sealing surface instead of improving the seal.
- Thread alignment: Check for crossed, stripped, or damaged threads that may prevent proper connector seating.
- Washer condition: Inspect the washer for wear, cracking, distortion, or uneven compression that may reduce sealing contact.
- Sealing surface: Look for cracks, scratches, or visible wear that may create a leak point.
- Surface cleanliness: Remove grit or debris that may prevent full contact between the sealing surfaces.
If inspection identifies damage that cleaning or correct alignment does not resolve, replacement of the affected sealing component may be the more appropriate repair.
Pressure Stress That Exposes Weak Connections
When a leak appears only after the irrigation system is pressurised, pressure stress often reveals an existing weak connection rather than proving the fitting is incorrect by itself. A weak seal, stretched tubing, or marginal connector fit may remain unnoticed until operating pressure places greater load on the connection. The main diagnostic task is determining whether pressure is exposing an existing cause or whether another fitting condition is responsible.
Inspect the connection before treating pressure as the primary cause because the same leak symptom can result from different conditions. The checklist below organises the main diagnostic criteria for pressure-related leak behavior before selecting a repair.
- Pressure level: Check whether the leak appears only when the system is operating under pressure.
- Pressure regulator: Confirm whether a regulator is present if the irrigation system is intended to use one.
- Connection tightness: Inspect the fitting and connector for incomplete sealing rather than relying on additional tightening.
- Tubing stretch: Look for stretched or deformed tubing that may reduce sealing contact.
- Leak timing: Note whether the leak starts immediately after pressurisation or develops during operation, as this may help distinguish pressure stress from another cause.
If leaks appear across multiple connection points instead of one local leak point, a broader review of pressure-related leak causes may be appropriate alongside inspection of each individual fitting.
Barbed and Compression Fitting Leak Differences
Barbed fitting and compression fitting leaks often differ because each fitting style seals in a different way. A barbed fitting commonly depends on the tubing gripping the barb and, where applicable, the condition of the punched hole, while a compression fitting relies more on correct seating and compression around the tubing. The main diagnostic task is identifying which sealing mechanism has failed before choosing a repair.
Compare the fitting style before assuming the same leak symptom has the same cause. A hole leak around a barbed fitting may relate to hole condition or reduced grip around the barb, while a seating leak on a compression fitting may relate to connector alignment or incomplete sealing contact. Tubing size, installation quality, operating pressure, and previous reuse can all influence the repair choice, so neither fitting style is universally less likely to leak.
| Comparison Criteria | Barbed Fitting | Compression Fitting |
|---|---|---|
| Sealing point | Seal forms where the tubing grips the barb and, when applicable, around the punched hole. | Seal forms where the tubing is compressed against the fitting. |
| Common leak type | Hole leak or reduced sealing around the barb. | Seating leak caused by incomplete compression or poor alignment. |
| Common failure condition | Stretched hole, damaged tubing, or reduced sealing contact. | Misaligned connector, worn sealing surface, or incomplete seating. |
| Repair choice | Depends on the condition of the hole, tubing, and barb seating. | Depends on restoring correct seating or replacing damaged sealing components when appropriate. |
Use the leak location together with the fitting style before deciding on a repair, because a hole-based leak and a seating-based leak may require different inspection paths even when the visible symptom appears similar.
Barbed Fittings Leaking at Punched Holes
When a barbed fitting leaks at a punched hole, the cause often relates to hole size, tubing stretch, or incomplete barb seating rather than the fitting itself. An irregular hole edge or reduced tubing grip may weaken the seal and allow water to escape. The main diagnostic task is determining whether the leak originates from the punched hole or from incomplete seating of the barbed connector.
Inspect the connection by comparing the condition of the punched hole with how the barbed fitting sits in the tubing. A stretched or uneven hole may no longer seal closely around the barb, while incomplete insertion can reduce the sealing surface. The checklist below separates the main local conditions that influence the leak symptom and the repair choice.
- Barb diameter: Check that the connector fits the punched hole without appearing excessively loose or requiring excessive force.
- Hole edge: Look for torn, stretched, or uneven edges that may reduce sealing contact.
- Tubing elasticity: Inspect whether the tubing has stretched enough to weaken its grip around the barb.
- Insertion force: Confirm the fitting is fully seated so the barb can create consistent sealing contact with the tubing.
Compression Fittings Leaking from Poor Seating
When a compression fitting leaks, incomplete seating or incompatible tubing dimensions are often the most likely causes. A connector that is not fully seated or tubing that does not match the fitting may prevent the seal from forming correctly. The main diagnostic task is determining whether the leak is caused by insufficient seating depth or by a tubing size mismatch.
Check the tubing insertion depth before assuming the fitting is damaged because a partially inserted connector may reduce sealing contact. If the fitting appears fully seated, compare the tubing diameter with the fitting size and assess whether the fitting grip feels consistent rather than unusually loose or excessively tight. Connection resistance during assembly may also indicate that the tubing and fitting are not working together as intended. If reseating the connector and verifying tubing dimensions do not stop the leak, replacement of the affected fitting or an incompatible tubing section may be the more appropriate repair.
How to Fix Leaking Drip Fitting Connections
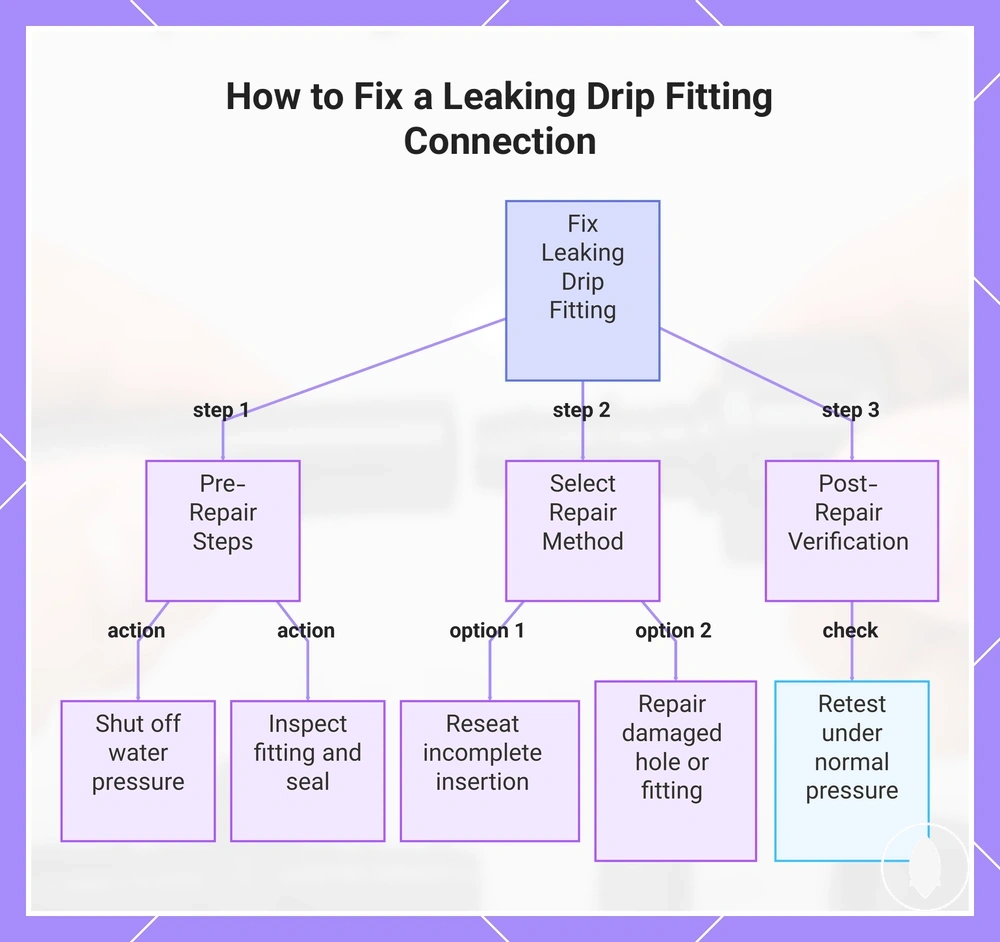
Fixing a leaking drip fitting connection starts after the leak location and likely cause have been identified. The correct repair depends on whether the fitting, tubing, punched hole, or seal has failed rather than following one repair method for every leak. The main decision is choosing the repair path that matches the diagnosed condition.
Keep the pressure off while you inspect the connection so the fitting, tubing, and seal can be checked without water flow affecting the diagnosis. A fitting that has not seated fully may only need to be reseated, while a damaged punched hole may require a plug or a repair coupling depending on the condition of the tubing. If the fitting or sealing surface is damaged, replacing the affected component may be the more appropriate repair. After any repair, retest the connection under normal operating conditions to check whether the leak has stopped.
- Pressure off: Shut off the water before inspecting the leaking connection.
- Inspect: Identify whether the leak originates from the fitting, tubing, punched hole, or sealing surface.
- Reseat: Fully reseat the connector if incomplete insertion appears to be the cause.
- Plug or repair coupling: Choose a plug for a suitable damaged hole, or use a repair coupling when the tubing section requires repair.
- Replace and retest: Replace damaged fittings or tubing where appropriate, then retest the repaired connection to verify whether the leak has been resolved.
This chart shows the step-by-step process to diagnose and repair a leaking drip fitting connection, from initial preparation to post-repair testing.
Reseat the Fitting and Check the Seal
Reseating the fitting is appropriate when the leak appears to result from incomplete seating rather than damaged tubing or a worn sealing surface. Keep the pressure off before handling the connection, then inspect the fitting and seal for visible damage or debris. The main decision is whether careful reseating restores the seal or whether another repair path is needed.
Align the fitting with the tubing and reseat it to the correct insertion depth without forcing the connection. Check that the sealing surfaces are clean because dirt or damage may prevent proper contact even after reseating. After reinstalling the fitting, retest the connection under normal operating pressure and observe the leak point. If the leak remains after reseating and inspection, a plug, repair coupling, or replacement may be more appropriate depending on the condition of the tubing, hole, or fitting.
Plug Stretched or Unwanted Tubing Holes
Plugging is appropriate when a leak comes from an unused, misplaced, or slightly stretched tubing hole that can still hold a secure plug. Keep the pressure off before handling the tubing, then inspect the hole edge and surrounding tubing wall before inserting the plug. The main decision is whether the hole can still seal with a plug or whether the tubing damage requires a different repair.
After inspecting the leak point, use the criteria below to decide whether plugging is appropriate before you retest the repair.
- Use a plug when: The hole diameter remains suitable for a secure plug fit, and the tubing wall is not significantly damaged.
- Inspect the hole: Check for stretched edges, tears, or deformation that may prevent the plug from sealing.
- Retest the repair: Restore pressure and retest the leak point to see whether water continues to escape.
- Do not use a plug when: The tubing has a long split, a large tear, or brittle wall damage that is unlikely to hold a reliable seal.
- Choose a repair coupling instead: If the damaged tubing section should be removed, a repair coupling is usually a cleaner repair than forcing a plug into compromised tubing. Replace the damaged section when appropriate.
Use Repair Couplings for Cut or Split Tubing
Using a repair coupling is appropriate when cut or split tubing near a fitting must be repaired by removing the damaged section. Keep the pressure off, inspect the tubing, and cut out the damaged portion before installing the repair coupling. The main decision is whether enough undamaged tubing remains to create a reliable seal after the damaged section is removed.
After removing the damaged section, use the checks below to verify the repair before you retest the connection.
- Cut quality: Make clean cuts so the tubing ends can seat evenly inside the repair coupling.
- Undamaged tubing length: Confirm there is enough sound tubing on both sides of the cut to support the repair coupling.
- Coupling fit: Inspect the repair coupling to ensure it matches the tubing and can be fully reseated.
- Insertion depth: Push the tubing fully into the repair coupling so the seal can form correctly.
- Retest: Restore pressure and retest the repaired leak point. If leakage continues, inspect the cut edges and coupling fit before deciding whether to replace additional tubing.
Replace End Caps or Washers That No Longer Seal
Replace a worn end cap, washer, or other sealing component when repeated leakage continues after the connection has been inspected and correctly assembled. A worn seal, flattened washer, cracked cap, or damaged thread may prevent the connection from sealing reliably. The main decision is whether seal wear has reached the point where replacement is more appropriate than further tightening.
Inspect the sealing components before deciding to replace them. The checklist below organises the most common signs of seal wear and helps identify when replacement is likely to be more appropriate than continued adjustment.
- Washer flattening: Replace the washer if it has become compressed, distorted, or no longer seals evenly.
- Cap cracks: Inspect the cap for visible cracks or deformation that may allow a repeated leak.
- Thread damage: Check for worn or damaged threads that may prevent the cap from seating correctly.
- Tubing end distortion: Inspect the tubing end for deformation that may reduce sealing contact.
- Repeated leak: If seepage continues after inspection and correct assembly, it may be appropriate to replace damaged fittings rather than continue tightening worn sealing components.
Sealants, Tape, and Temporary Leak Repairs
Sealants or tape may help reduce a leak in certain situations, but they should not replace correcting the underlying fitting, tubing, connector, or seal problem. A temporary repair is most appropriate after the leak cause has been identified and when the original sealing condition cannot be restored immediately. The main diagnostic task is deciding whether the repair supports the original seal or only masks the symptom.
Match the repair method to the leak source instead of applying sealant to every connection. Tape may be suitable for some threaded joins, while worn seals, hole leaks, tubing splits, or pressure-driven leaks often require correction of the failed sealing surface or component. If leakage continues after a temporary repair, inspect the fitting, tubing, connector, and pressure conditions because the original cause may still be present.
The table below compares common leak conditions with when a temporary sealing approach may or may not be appropriate. Judge any temporary repair by whether the original sealing condition has actually improved rather than whether the visible leak has only been reduced.
| Leak condition | Temporary repair role | Primary repair focus |
|---|---|---|
| Threaded join | Tape or sealant may help when the threaded sealing surface is appropriate. | Inspect thread condition and correct assembly. |
| Worn seal | Sealant may reduce the symptom without restoring the sealing surface. | Replace the worn sealing component. |
| Hole leak | Temporary sealing is unlikely to correct a damaged tubing hole by itself. | Repair the damaged hole or affected tubing. |
| Tubing split | Tape may temporarily reduce leakage but may not restore the tubing. | Repair or replace the damaged tubing section as appropriate. |
| Pressure-driven leak | Temporary sealing may not resolve a weak connection exposed by pressure. | Inspect the fitting, seal, and underlying pressure-related cause. |
When Tape or Sealant Does Not Fix the Fitting Problem
When a leak continues after tape or sealant has been applied, the cause is often poor fitting contact, damaged tubing, an incorrect hole size, or pressure stress rather than the sealing material itself. Tape or sealant may not restore the original seal when the leak comes from a failed sealing surface or an unsuitable connection. The main diagnostic task is identifying the true cause before selecting the appropriate repair.
Threaded leaks and tubing-wall leaks should be assessed separately because they rely on different sealing conditions. Tape or sealant may help where threaded surfaces are designed to create the seal, but they are less likely to correct leaks caused by split tubing, stretched hole edges, poor connector contact, or a damaged sealing surface. When pressure exposes a weak connection, the visible symptom may be reduced without correcting the underlying cause, so inspect the fitting, tubing, connector, sealing surface, and water pressure before deciding on the repair.
When a Plug or Coupling Is the Cleaner Repair
A plug or a coupling is the cleaner repair when the repair choice matches the damage size and location. A plug may be appropriate for a hole that can still form a reliable seal, while a coupling may be more suitable when split tubing or a damaged section should be removed. The main decision is determining whether the hole condition or the tubing damage is driving the leak recurrence.
The criteria below organise the main repair variables so the repair choice follows the actual condition rather than the visible symptom.
- Hole condition: A plug may be suitable when the hole edge remains intact enough to support a reliable seal.
- Split tubing length: A coupling may be more appropriate when the damaged section extends beyond a single hole or local leak point.
- Available straight tubing: A coupling depends on having enough undamaged tubing on both sides to seat correctly.
- Fitting proximity: Damage close to a fitting may affect whether there is sufficient space to install a coupling or whether another repair choice is more practical.
- Leak recurrence: If the same leak returns after an earlier repair, inspect the hole condition and surrounding tubing before deciding whether a different repair choice is appropriate.
When a Leaking Fitting Should Be Replaced
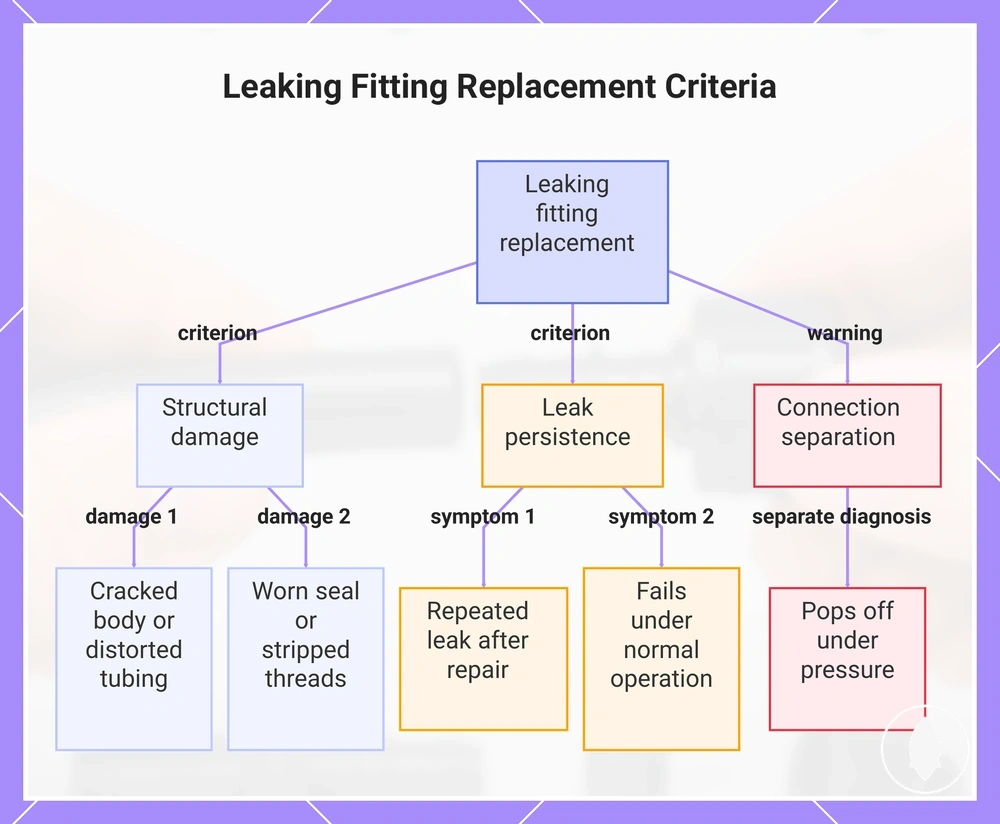
Replacing a leaking fitting is usually appropriate after inspection shows that reseating, plugging, applying tape, or tightening is unlikely to restore a reliable seal. A repeated leak may indicate a failed fit, damaged tubing, a worn seal, or pressure stress rather than a connection that only needs further adjustment. The main decision is determining whether the fitting can still hold a reliable seal under normal operation.
Inspect the fitting and surrounding tubing before deciding to replace any component because many leaks can still be traced to a correctable installation issue. If inspection identifies permanent damage such as a crack, a worn seal, a worn washer, a damaged cap, or stripped threads, replacement may be more appropriate than another repair attempt. The checklist below organises the main replacement criteria before reinstalling and testing the connection.
- Repeated leak: Replace the fitting if the same leak returns after appropriate inspection and repair attempts.
- Cracked fitting body: Replace a fitting with a visible crack that may prevent a reliable seal.
- Worn seal, washer, or cap: Replace sealing components that no longer provide consistent sealing contact.
- Distorted tubing end or stripped thread: Replace damaged parts if deformation or thread damage prevents proper assembly.
- Will not hold under normal operation: If the fitting continues to leak after correct installation and inspection, replacement may be the more suitable repair choice.
If the connection repeatedly separates under operating pressure instead of only leaking, inspect fittings that pop off because pressure and fit may require a separate diagnosis before replacing additional components.
This chart shows the main criteria that indicate a leaking fitting should be replaced, including physical damage, persistent leaks, and connection separation.
Leak Checks After the Repair
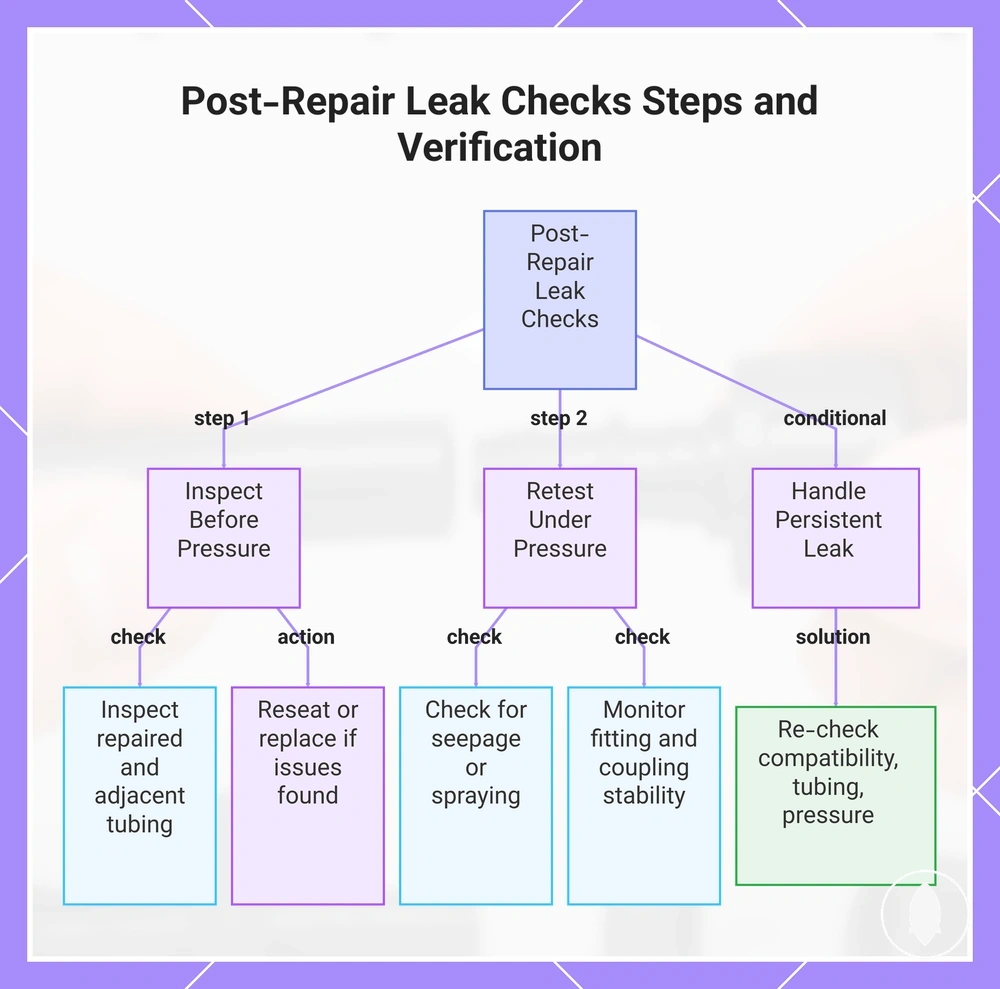
Retesting after a repair helps confirm whether the leak has stopped and whether the repair created a new weak point nearby. Keep the pressure off while you inspect the repaired connection, then restore pressure and retest the original leak point and the adjacent tubing. The main diagnostic task is deciding whether the repair remains stable under normal operating conditions.
Leak checks should focus on the repaired connection and nearby tubing instead of expanding into broader system maintenance. Inspect the fitting before restoring pressure, then retest the connection under normal operation. If inspection shows movement or renewed leakage, reseat the fitting, check the plug or repair coupling, or replace a damaged component before testing again. The checklist below organises the main verification points after the repair.
- Pressure restoration: Restore normal operating pressure and inspect the repaired leak point for immediate leakage.
- Slow seepage or spraying: Check for moisture, seepage, or spraying water that may indicate an incomplete seal.
- Fitting movement: Watch for movement at the fitting that may suggest a weak connection.
- Plug or repair coupling stability: Confirm that the plug or repair coupling remains fully seated during operation.
- Repeated leak timing: If the same point leaks again after correct reseating or repair, re-check compatibility, tubing damage, or pressure rather than adding more temporary sealant.
This chart outlines the key stages and checks for verifying a leak repair, from initial inspection without pressure to retesting under normal operation and handling persistent leaks.