Drip Irrigation Fittings That Keep Popping Off
Drip irrigation fittings usually keep popping off when the connection cannot hold against pressure, poor fit, damaged tubing, or insecure seating. The visible problem is a loose connection where the fitting grip no longer holds the tubing in place. This is a connection failure, not the same symptom as ordinary leaking, low flow, or a general irrigation-system fault.
When the same connector keeps coming loose, the repair decision depends on what is weakening the joint. Higher pressure can contribute to connection failure, poor fit can reduce fitting grip, damaged tubing can weaken the connection, and incomplete seating can leave a barbed fitting or compression fitting less secure. The underlying cause depends on the fitting type, tubing condition, and system configuration.
Use the diagnostic path to separate pressure, tubing condition, fitting grip, and seating before deciding on a repair. For broader fitting context, the drip irrigation fittings hub explains how connector types and tubing connections relate to the wider fitting system.
What a Popping-Off Drip Irrigation Fitting Means
A popping-off fitting is a connection failure where the fitting no longer stays secured inside or over the drip tubing. The visible symptom is a disconnected fitting rather than a connection that remains in place during normal operation. Pressure, tubing grip, insertion depth, or heat exposure may contribute to why the fitting came loose, but the symptom itself is the visible separation.
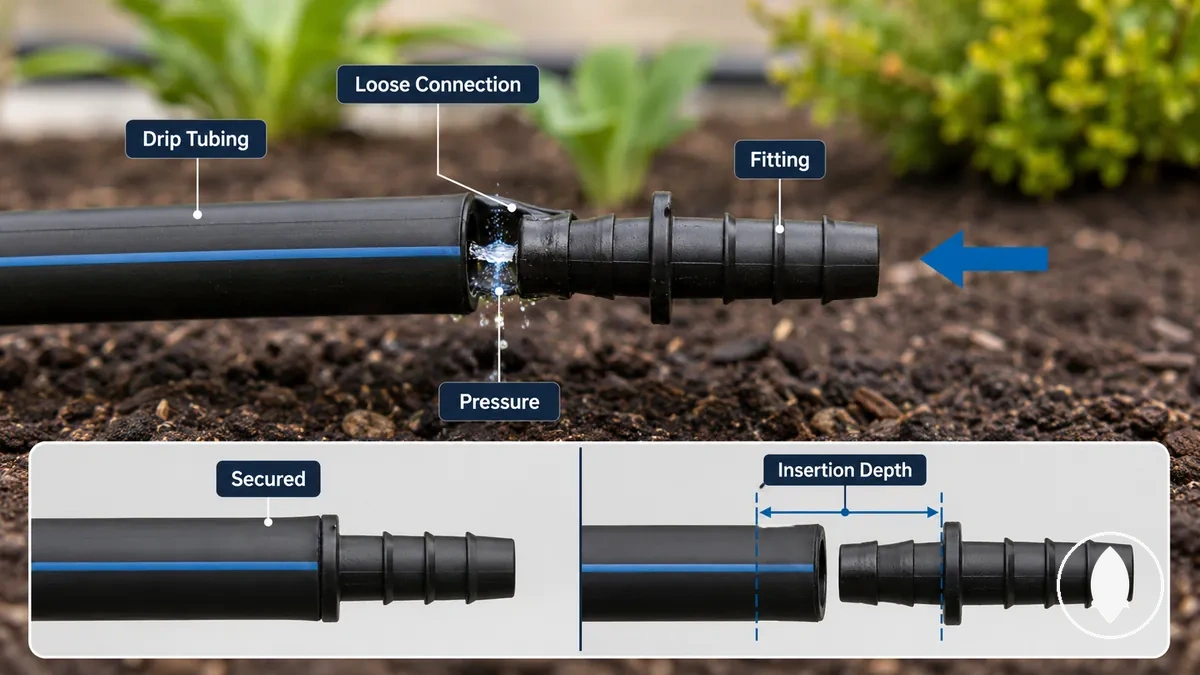
What a Popping-Off Drip Irrigation Fitting Means is easiest to understand by observing where the connection loses its hold. A loose connector may separate at startup, during operation, or after heat exposure when tubing grip or insertion depth is no longer sufficient for the system conditions. A popped-off fitting can be associated with leaks or pressure problems, but it is not the same symptom as leaking or poor flow.
The following observations help confirm the visible connection failure before moving into detailed diagnosis:
- The drip tubing has become disconnected from the fitting.
- Water sprays or escapes from the joint after the fitting slips out.
- The fitting appears only partly inserted, indicating limited insertion depth.
- The connection separates when the system starts up or when pressure changes.
- The fitting repeatedly slips from the tubing after being reconnected.
Symptoms That Separate Popping Off From Leaking or Poor Flow
A disconnected fitting is identified by visible separation between the fitting and the tubing, while a leaking joint or poor flow usually leaves the connection in place. The visible connection state is the quickest way to separate these symptoms before choosing a repair path. Compare the spray pattern, pressure drop, and tubing movement before assuming they share the same cause.
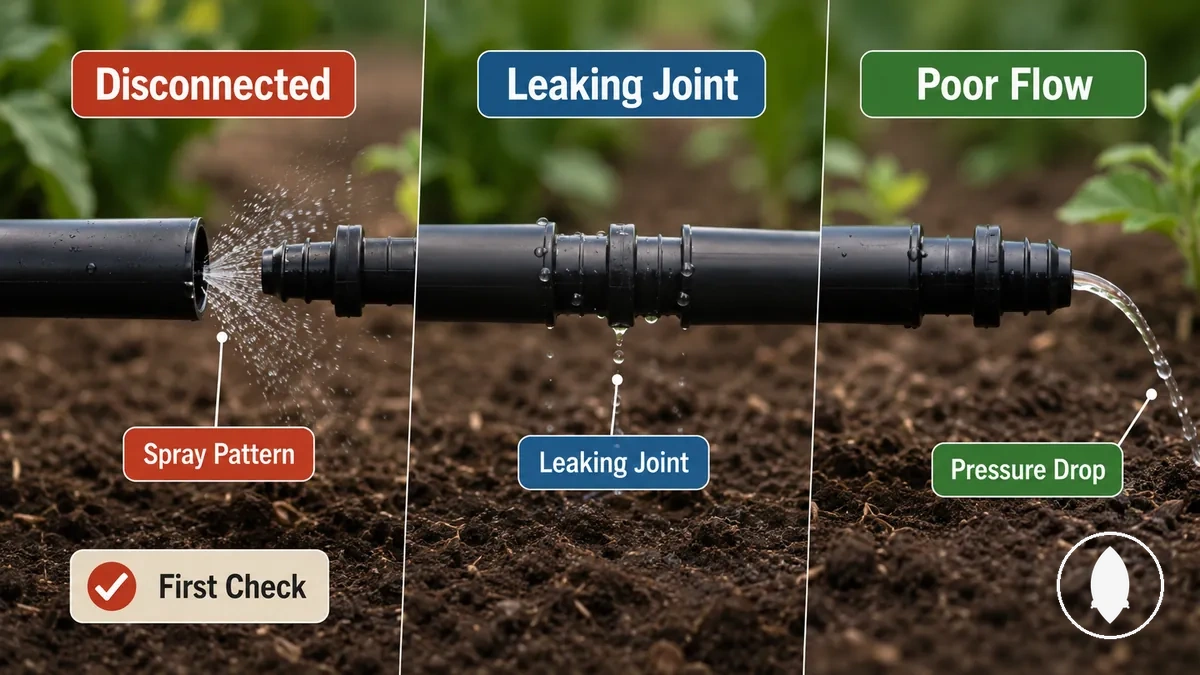
Visible behavior helps organize the diagnosis. A disconnected fitting often shows tubing movement and an obvious spray pattern because the connection has separated, while a leaking joint may show loose seepage even though the fitting remains attached. For a closer comparison with leaking fitting symptoms, first determine whether the connection is still intact before following a repair path. The first check should confirm the connection state.
Edge cases can include more than one symptom at the same time. A pressure drop, weak flow, or spray may have different underlying reasons depending on the system condition, so inspect the fitting, tubing, or pressure condition according to the visible symptom rather than assuming every flow or leak issue comes from the connector.
| Symptom pattern | What you see | Likely direction | First check |
|---|---|---|---|
| Popped-off fitting | Disconnected fitting, tubing movement, visible spray pattern | Connection has separated | Check whether the fitting is still secured in the tubing |
| Leaking joint | Loose seepage around a connected fitting | Joint may not be sealing properly | Inspect the joint for visible leakage while it remains connected |
| Poor flow | Weak flow with no visible disconnection | Pressure drop or another flow-related condition may be involved | Check the flow path before focusing on the connector |
Why Drip Irrigation Fittings Pop Off the Tubing
Drip irrigation fittings usually pop off the tubing when the connection force becomes weaker than the water pressure, tubing memory, or movement at the joint. Which condition is responsible depends on the fit, tubing condition, seating, and how the system is operating rather than on a single cause.
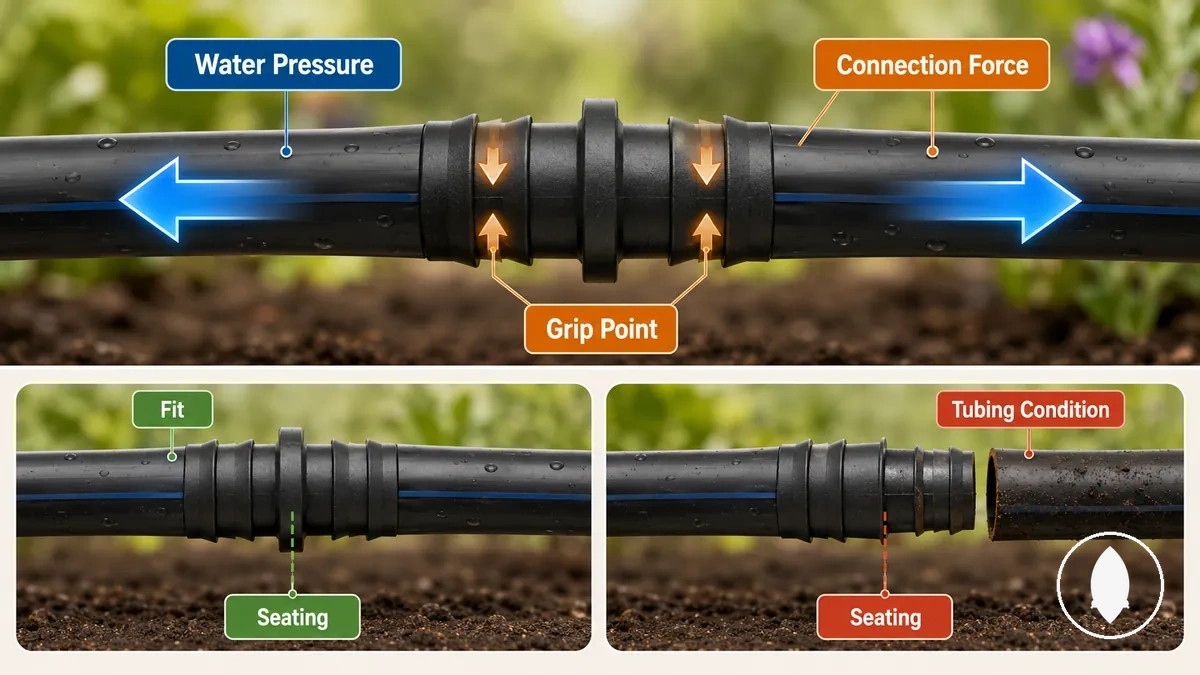
Drip irrigation fittings and tubing remain connected when the grip attribute provides enough holding force to resist the forces acting on the joint. If water pressure, tubing memory, or movement at the joint exceeds that connection force, the fitting may separate from the tubing. A stretched tubing end, reduced fit, or incomplete seating can lower the connector grip and increase failure risk. The failure signal depends on how these conditions interact rather than on one universal explanation.
The main cause families become easier to compare when they are grouped by force, fit, tubing condition, and seating. The table below organizes each condition according to the affected part or force, the changing attribute, and the resulting failure signal.
| Part or force | Attribute or condition | What changes | Failure signal |
|---|---|---|---|
| Water pressure | Connection force is lower than operating pressure | Force acting on the joint increases | Fitting may pop off during operation |
| Tubing fit | Loose fit or reduced grip attribute | Holding force decreases | Loose joint or repeated separation |
| Tubing end condition | Tubing memory or stretched end | Grip becomes less secure | Grip loss at the connection |
| Fitting seating | Incomplete seating | Insertion depth is reduced | Early disconnection or movement at the joint |
| Joint movement | Repeated shifting during operation | Connection gradually loosens | Failure after the system has been running |
If a fitting pops off immediately, the connection force may already be insufficient because of fit, seating, or operating pressure. If the fitting separates only after the system has been running for a while, tubing memory, gradual movement at the joint, or changing operating conditions may have reduced the grip over time.
Pressure that exceeds the connection tolerance
When excess pressure at the connection becomes greater than the connection tolerance, a drip irrigation fitting may pop off the tubing. This pressure-related failure can occur when the force acting on the fitting exceeds the connection's ability to hold, although the outcome depends on the fitting type, tubing rating, and system configuration.
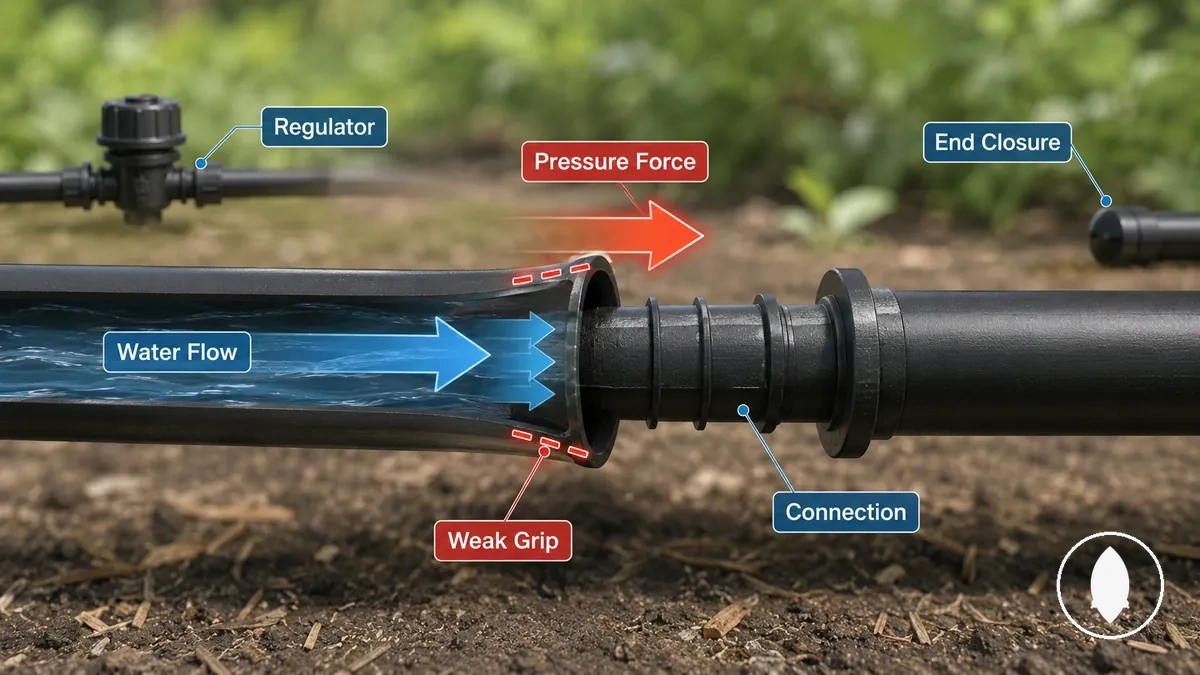
Pressure that exceeds the connection tolerance acts directly on the fitting connection rather than the tubing alone. A regulator may help manage line pressure when the system is designed to use one, while a startup surge or temporary pressure spike can increase the force at the joint. Blocked or capped end closures may also contribute to localized pressure buildup, especially if a weak connection point is already present. Use the checklist below to identify pressure-related conditions before focusing on repair.
- Check whether a regulator is installed if the system configuration requires one.
- Observe whether a startup surge causes the fitting to separate as water begins flowing.
- Inspect blocked or capped end closures that may contribute to pressure buildup.
- Look for repeated failures at the same weak connection point rather than treating each event as unrelated.
- Consider the tubing rating and fitting type together before concluding that excess pressure is the primary cause.
Tubing and fitting sizes that do not grip securely
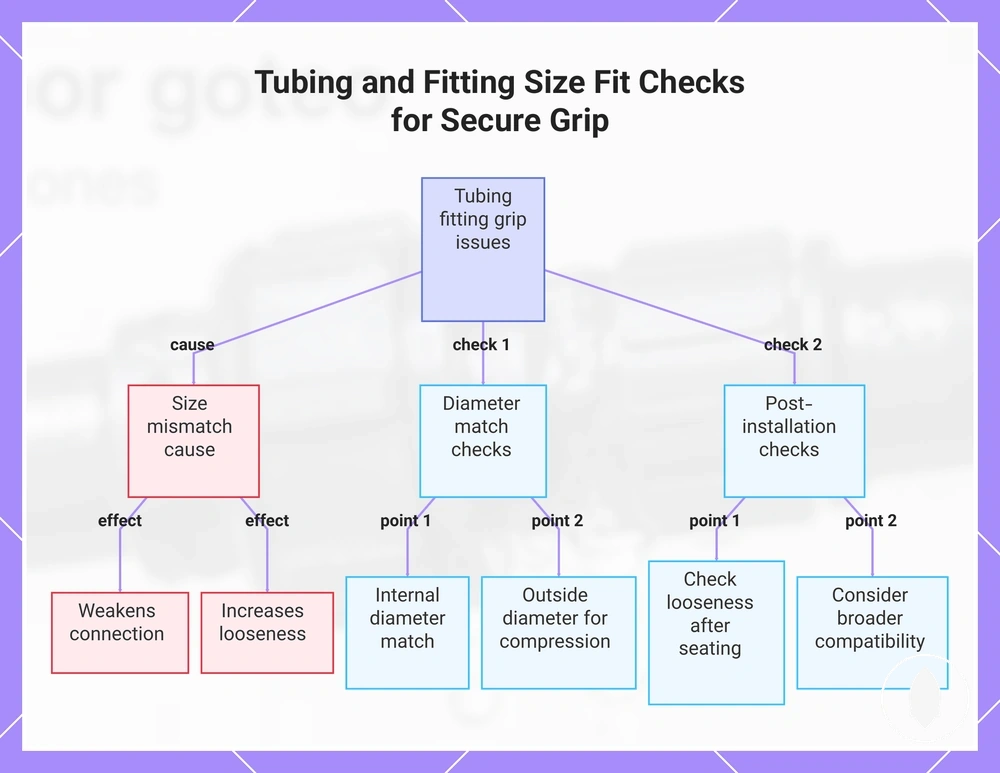
Drip tubing and fitting sizes must match closely enough to create a secure grip. A size mismatch can weaken the connection between the drip tubing and the fitting size, increasing looseness after insertion and making the fitting more likely to slip under normal operating conditions.
Grip depends on how the tubing dimensions match the fitting style rather than on one universal measurement. A barbed contact point primarily relies on the internal diameter for holding force, while a compression contact point may also depend on the outside diameter where that fitting style is used. Use the checks below to verify local fit conditions before looking for other causes. If repeated pop-offs occur across multiple fittings, continue with size and tubing fit checks for broader compatibility assessment.
The following checks help confirm whether poor fit is reducing grip at the connection:
- Verify that the tubing internal diameter matches the intended fitting size.
- Check the outside diameter where the fitting style uses a compression contact point.
- Confirm whether the fitting uses a barbed contact point or a compression contact point.
- Check for looseness after the fitting has been fully seated.
- If repeated failures occur across multiple fittings, consider a broader compatibility issue rather than an isolated connection.
This chart shows the causes of poor grip between tubing and fittings and the key checks to verify proper size matching.
Stretched, worn, or heat-softened tubing ends
If a fitting that once stayed secure now slips out, the tubing end condition may have changed even though the original fitting size is still correct. Stretched tubing, a worn tubing end, or heat-softened tubing can reduce grip, allowing the fitting to loosen where it previously held securely.
Tubing end condition changes how firmly the fitting remains engaged over time. A stretched opening, ovalized opening, cracked end, repeated removal, or age-related loss of tension can reduce grip even when the fitting size has not changed. Depending on the tubing condition, cutting back to a sound section or replacing the affected tubing end may help, but the appropriate repair depends on the extent of the deformation or wear.
The checks below help determine whether tubing end condition is reducing grip:
- Look for a stretched opening that no longer grips the fitting firmly.
- Inspect the tubing end for a cracked end or other visible damage.
- Check whether the tubing opening has become ovalized after repeated use.
- Notice whether heat-softened tubing feels looser than the surrounding line.
- Consider whether repeated removal or failure after reseating has contributed to loss of tension and reduced grip.
Barbed or compression fittings that are not fully seated
Barbed or compression fittings that are not fully seated can leave a mechanically insecure joint even when the correct fitting is being used. Correct seating depends on adequate insertion depth and fitting position so the tubing can grip the connection without leaving an unstable joint.
Correct seating should clarify whether the connection has reached proper stability inside the barbed fitting or compression fitting before any pressure is applied. Seating is easiest to verify by checking the visible connection rather than pushing the fitting further in. A square cut quality, a straight tubing angle, the compression collar position where applicable, and the absence of a visible gap can all indicate that the fitting is fully seated. Even when a fitting is fully seated, pressure or tubing damage may still cause the connection to fail under some conditions.
- Check that the barbed fitting or compression fitting is fully seated without applying excessive force.
- Look for a visible gap that may indicate insufficient insertion depth or incorrect fitting position.
- Confirm that the tubing has a square cut quality and enters at a straight tubing angle.
- Verify that the compression collar is in the correct position where a compression fitting is used.
- Avoid applying excessive force, as this may damage tubing without improving seating.
How to Stop a Drip Irrigation Fitting From Popping Off
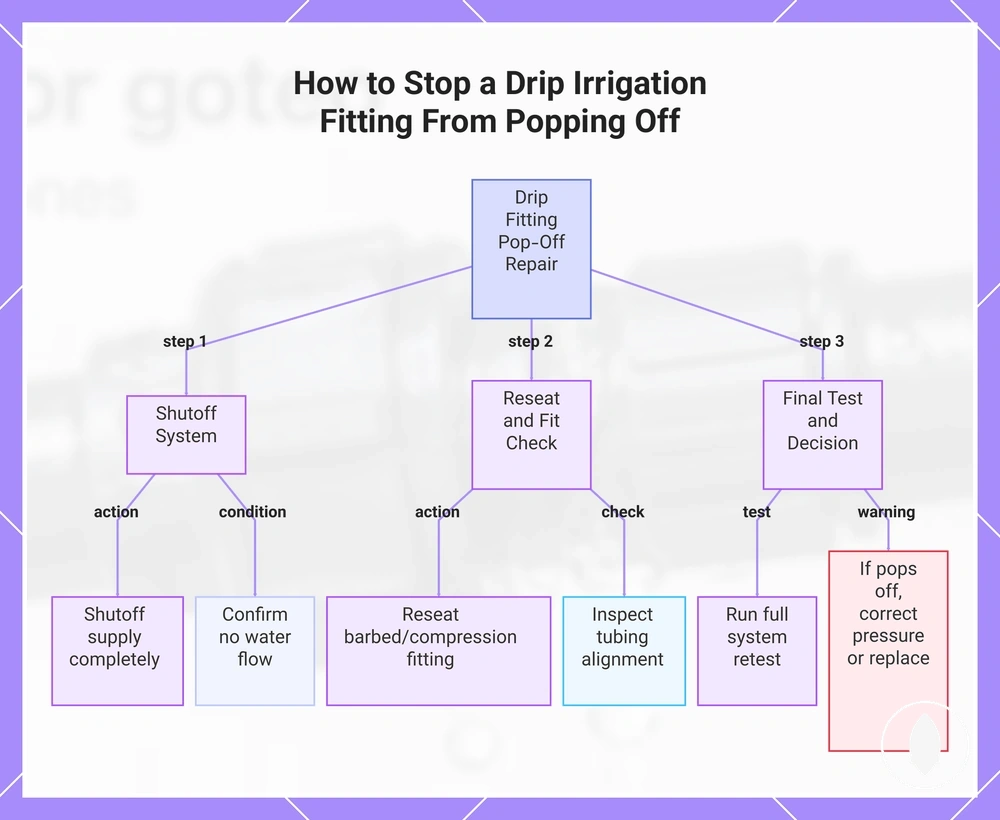
The repair process to stop a drip irrigation fitting from popping off should restore grip first, then verify pressure before assuming the fitting itself is defective. This sequence ensures the connection is brought back to an acceptable condition through correct reseating before system-level checks are applied.
The sequence below explains the repair order from shutoff to reseat, fit check, pressure check, and retest. Each step follows a corrective action → acceptable condition → failure prevention logic to keep the process controlled and safe.
- Shutoff system water flow. Action: shutoff supply completely. Acceptable condition: no active pressure in the line. Stop condition: any water movement indicates unsafe access.
- Reseat fitting connection. Action: reseat the barbed or compression fitting into position. Acceptable condition: fitting holds with restored grip. Stop condition: repeated slipping indicates unresolved connection failure.
- Fit check at tubing interface. Action: inspect tubing end alignment and engagement. Acceptable condition: secure fit with no instability at the connection. Stop condition: distorted tubing prevents stable seating.
- Pressure check after reseating. Action: verify pressure conditions in the system. Acceptable condition: pressure remains within expected operating range. Stop condition: abnormal pressure indicates system-level correction is required.
- Corrective action validation. Action: apply light flow to test connection stability. Acceptable condition: fitting remains secure without movement. Stop condition: repeated failure indicates corrective action is not sufficient alone.
- Retest system operation. Action: run full system test. Acceptable condition: stable performance with no disconnection. Stop condition: recurring pop-off indicates need for pressure control or replacement.
If the fitting continues to pop off after reseating, fit check, and pressure check, the repair should stop and shift to system pressure correction or component replacement rather than repeated adjustment attempts.
This chart shows the repair sequence to stop a drip irrigation fitting from popping off, from system shutoff to final test and decision.
Reseat the fitting and restore a tight tubing end
Reseating a fitting restores grip when the tight tubing end can still hold tension, meaning the connection can recover through correct repositioning rather than replacement. This works when the tubing structure is still stable enough to support full insertion and firm seating without ongoing slippage.
The method focuses on rebuilding a stable interface through clean cutting, square tubing end alignment, full insertion, and firm seating, followed by a retest under running water to confirm whether the connection maintains hold tension. If retest under running water still shows a loose fitting or separation, the tight tubing end no longer holds tension and reseat alone is not sufficient. :contentReference[oaicite:0]{index=0}
- Shutoff water flow: Action is to stop system pressure completely. Check condition is no active flow in the line. Stop condition is continued movement indicating unsafe handling.
- Clean cutting and inspect tubing end: Action is to remove damaged or uneven section. Check condition is a square tubing end suitable for reseating. Stop condition is cracked or deformed tubing that cannot support hold tension.
- Full insertion of fitting: Action is to reinsert the barbed fitting or connection point. Check condition is correct alignment without forced entry. Stop condition is repeated slipping during insertion.
- Firm seating at connection: Action is to secure the fitting into final position. Check condition is stable engagement with tight tubing end contact. Stop condition is visible looseness after seating.
- Retest under running water: Action is to restore flow gradually. Check condition is maintained grip without separation. Stop condition is renewed popping off indicating failure of reseat method.
Reduce pressure before the connection fails again
When a fitting holds briefly but fails again under water pressure, the issue often indicates repeated failure caused by conditions that exceed what the connection can consistently handle. The priority is to reduce pressure before repeating repair actions, since ongoing failure usually signals a broader system condition rather than a single loose fitting.
To reduce pressure and stabilize the connection, check for conditions that can create repeated failure across the line, including regulator check, blocked outlet conditions, line flushing needs, zone size imbalance, capped ends, and whether a pressure-rated connector is appropriate for the setup. If several fittings in the same zone fails again after short operation, the issue may extend beyond one connection and indicate a shared pressure condition.
- Regulator check: Action is to confirm whether a regulator is installed and functioning. Condition is controlled pressure delivery. Outcome is reduced risk of repeated connection failure caused by uncontrolled pressure.
- Blocked outlet check: Action is to inspect emitters or outlets for obstruction. Condition is open flow paths. Outcome is reduced pressure buildup that may cause the fitting to fails again.
- Line flushing: Action is to flush the system line to remove debris. Condition is restored flow consistency. Outcome is reduced localized pressure spikes affecting the connection.
- Zone size check: Action is to assess whether the zone is too large for balanced distribution. Condition is stable flow across all points. Outcome is reduced uneven pressure that can stress fittings.
- Capped ends check: Action is to inspect any closed or capped ends in the system. Condition is correct outlet distribution. Outcome is reduced trapped pressure that may contribute to repeat failure.
- Pressure-rated connector check: Action is to confirm connector suitability for system demand. Condition is appropriate pressure-rated connection. Outcome is improved resistance against repeated failure under operating conditions.
When clamps help and when they hide the real problem
Tubing clamp decision depends on whether looseness is caused by temporary support need or by pressure, fit, or tubing damage issues. A tubing clamp may support connection stability in limited cases, but it can also masks the real problem when the barbed fitting grip is already weak or when the connection slips after tightening.
Clamp use should be evaluated based on whether the connection issue is surface-level or structural. If the tubing clamp only reduces movement without addressing pressure, fit mismatch, or tubing damage, the connection may continue to fail. Stop using a clamp-based approach when the fitting repeatedly slips after tightening, as this often indicates a deeper connection issue rather than a support need. :contentReference[oaicite:0]{index=0}
| Clamp may help | Clamp may hide the real problem |
|---|---|
| Temporary movement at a stable barbed fitting grip | Ongoing slips after tightening due to poor fit or tubing damage |
| Minor looseness without pressure irregularity | Pressure imbalance causing repeated connection stress |
| Stable tubing condition with secure seating | Degraded tubing or stretched end affecting grip |
- Use tubing clamp only when it provides support connection without masking structural issues
- Avoid clamp reliance when pressure, fit, or tubing damage is present
- Check barbed fitting grip stability before applying clamp support
- Stop clamp use if the connection slips after tightening
When to Replace the Fitting or Cut Back the Tubing
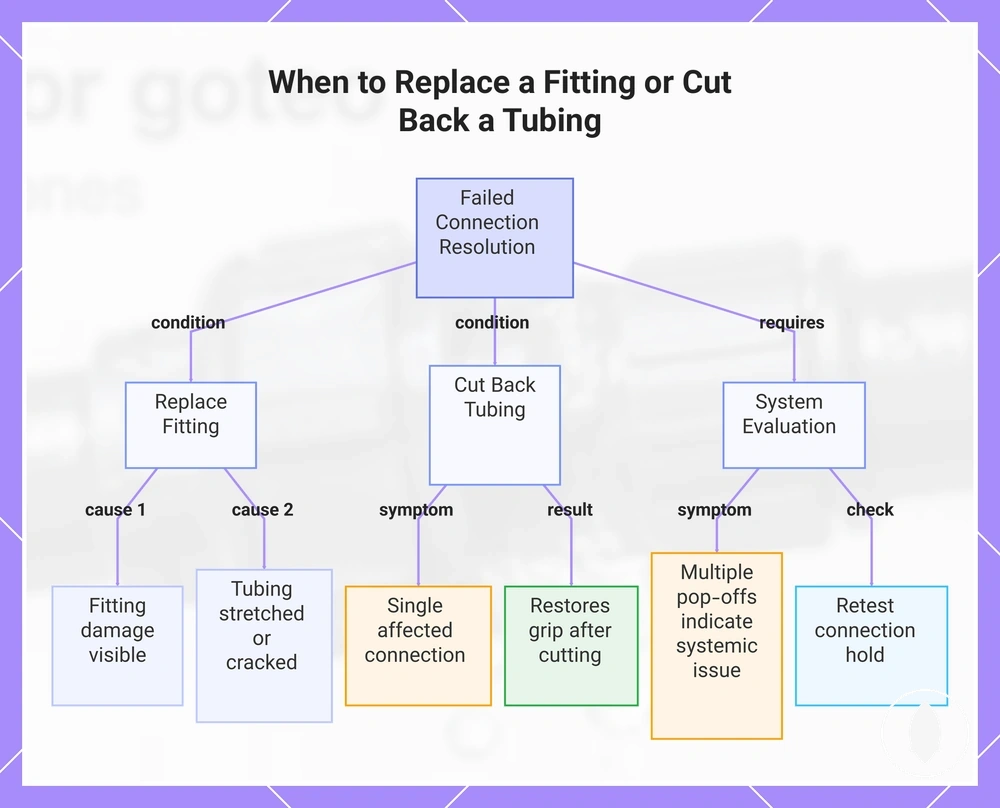
A failed connection is typically resolved by deciding whether to replace the fitting or cut back the tubing based on whether the issue comes from fitting damage, stretched tubing, or a weakened connection point. When a failed connection cannot maintain a stable grip, the decision shifts from adjustment to correcting the underlying cause instead of repeatedly reseating the same joint.
Replacement decisions depend on visible fitting damage, stretched tubing, cracked tubing, repeated pop-offs, and poor engagement caused by sizing or connection mismatch. In cases where failure persists, the action may include replace fittings that will not hold as a conditional step when the barbed fitting grip can no longer maintain stability without ongoing slipping or deformation.
When only one connection is affected, cutting back the tubing end or replacing a single fitting may restore grip, while repeated pop-offs across multiple points in the same zone often indicate a broader pressure or sizing condition that should be evaluated before extending replacement across the system.
The following checklist helps determine whether the failed connection is local or requires replacement action:
- Fitting damage is visible and prevents stable barbed fitting grip
- Tubing is stretched or deformed and no longer holds a tight connection
- Cracked tubing reduces sealing strength at the connection point
- Repeated pop-offs continue after correct reseating
- Poor size match is preventing stable engagement between components
- Pressure-related stress is contributing to recurring failure patterns
- Retest shows the connection cannot maintain hold under normal operation
This chart shows the decision process for fixing a failed connection based on whether the issue is local or systemic.
Pressure Checks Before Another Fitting Repair
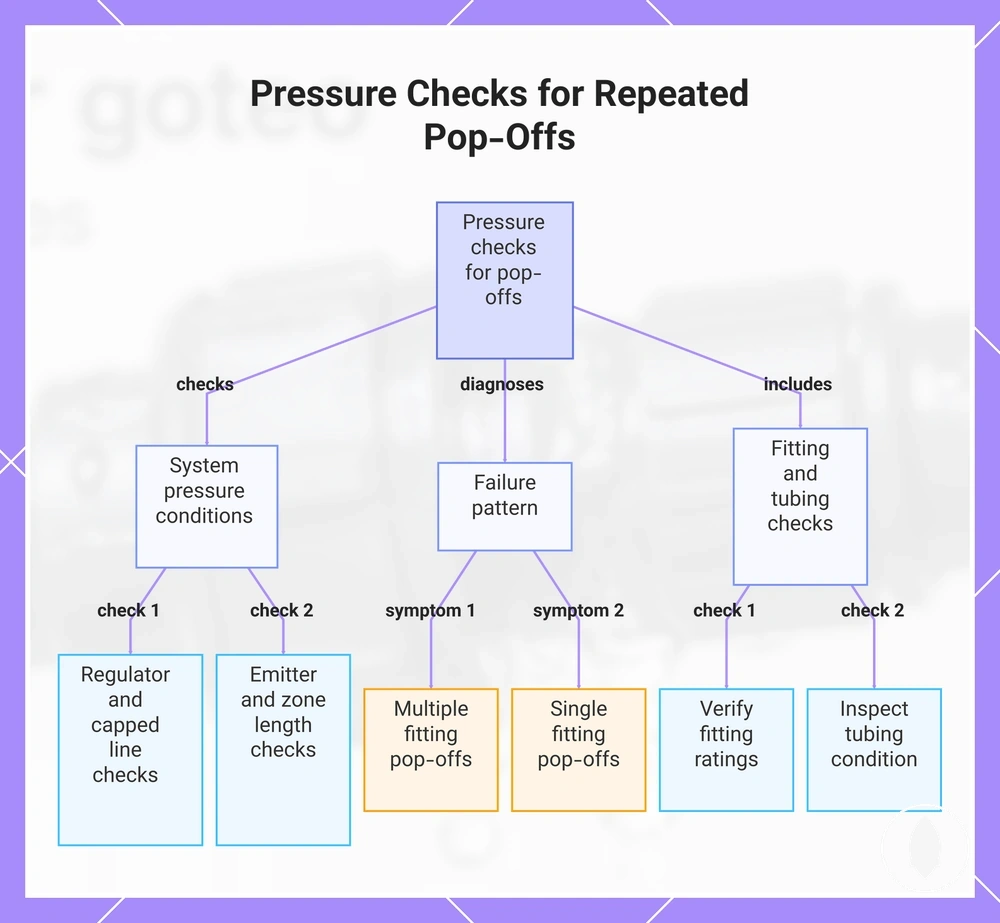
Repeated pop-offs should trigger pressure checks before another fitting is reseated or replaced, because unresolved pressure conditions can continue causing a failed connection even after repair attempts.
Pressure checks help identify system conditions that may be driving repeated pop-offs, including regulator presence, blocked emitters, capped lines, zone length, and whether failures occur across multiple fittings. These indicators help distinguish whether the issue is local or system-wide, especially before a fitting is reseated or replaced again. Fitting ratings and tubing conditions should also be considered during this diagnosis stage.
This step also clarifies the boundary between local repair and system-level causes linked to water pressure problems. Pressure control can support stable connections, but it does not replace checks for fitting damage, tubing condition, or compatibility issues that may still cause repeated pop-offs even after adjustments.
- Check regulator presence to confirm whether pressure is being controlled at the source
- Inspect blocked emitters that may cause localized pressure buildup
- Check capped lines that can trap pressure within sections of the system
- Evaluate zone length to see if distribution is uneven across the layout
- Observe whether repeated pop-offs occur at several fittings instead of a single point
- Consider fitting ratings and tubing compatibility before repeating repair attempts
This chart shows the system conditions, failure patterns, and component checks that help diagnose repeated pop-offs before reseating or replacing a fitting.
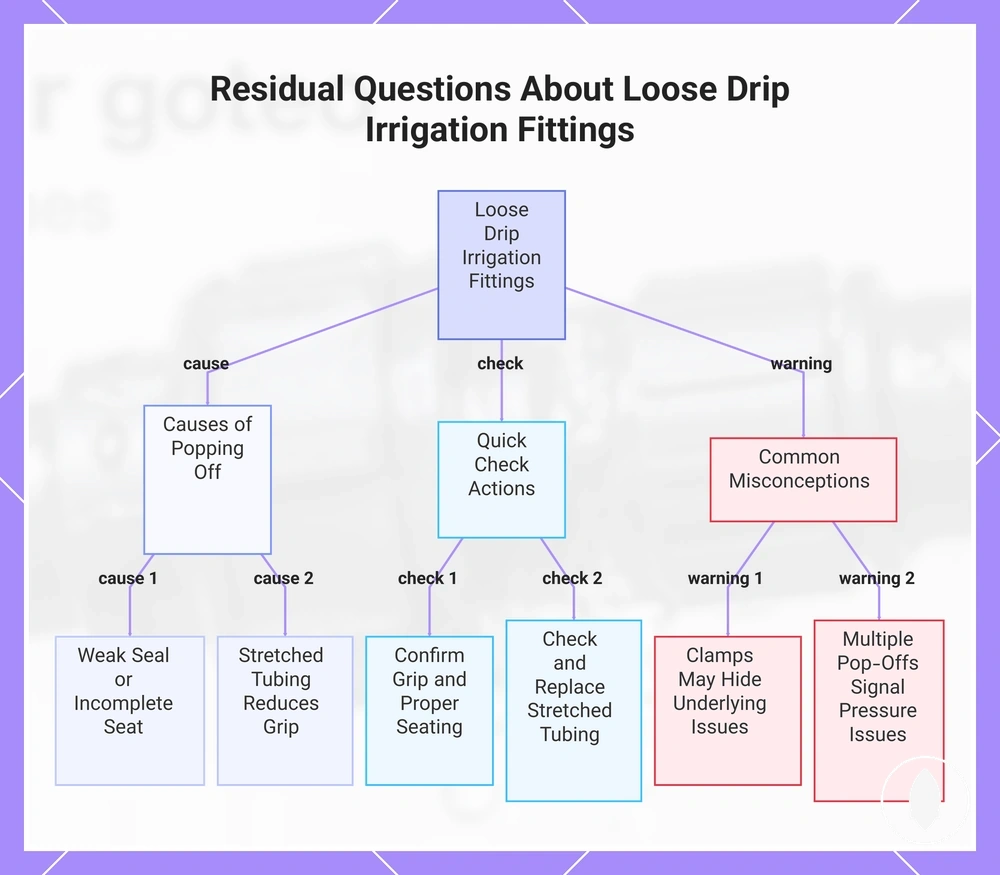
Residual Questions About Loose Drip Irrigation Fittings
Loose drip irrigation fittings often raise quick follow-up questions after diagnosis, especially around why they pop off repeatedly, whether clamps should be used, when stretched tubing affects tubing grip, and when pressure becomes the likely cause. These answers focus on quick checks for loose drip irrigation fittings without repeating full diagnostic explanations.
Why do loose drip irrigation fittings pop off repeatedly?
Loose drip irrigation fittings pop off repeatedly when tubing grip is not strong enough to hold the connection under normal use. This often relates to a weak seal at the connection point, stretched tubing, or incomplete seating. A quick check of the fitting alignment and tubing condition usually shows where the instability starts.
Does using clamps stop loose drip irrigation fittings from popping off?
Clamps may temporarily reduce movement, but they do not always solve loose drip irrigation fittings that pop off repeatedly. In many cases, clamps can hide the underlying issue such as poor tubing grip or stretched tubing. A quick check is still needed to confirm whether the connection itself is stable.
Should stretched tubing be replaced in loose drip irrigation fittings?
Stretched tubing often reduces tubing grip, making loose drip irrigation fittings more likely to pop off repeatedly. When the tubing no longer holds a secure shape, replacement or cutting back the damaged section may be required. A quick check of the tubing end usually confirms if grip loss is permanent.
When is pressure the cause of loose drip irrigation fittings popping off?
Pressure is likely involved when multiple loose drip irrigation fittings pop off repeatedly across the same system area. This pattern suggests the issue is not only at the connection but also in system behavior. A quick check of flow consistency can help indicate whether pressure is contributing.
How can you quickly check loose drip irrigation fittings?
A quick check involves confirming tubing grip, checking for stretched tubing, and ensuring the fitting is fully seated. If fittings still pop off repeatedly after reseating, the issue is likely beyond a simple adjustment. This helps separate minor connection issues from those needing replacement.
This chart summarizes the causes, quick checks, and common misconceptions for loose drip irrigation fittings that pop off repeatedly.