Automatic Watering Kit Troubleshooting
Automatic watering kit troubleshooting matches visible symptoms with likely causes and suitable fixes instead of treating every fault as the same issue. Common symptoms relate to conditions involving the water source, pressure, flow, tubing, emitters, connectors, timer control, leaks, or maintenance state. Each symptom must be matched to its likely cause before selecting a fix.

When an automatic watering kit shows weak flow, uneven delivery, or unexpected watering, the first check is the relationship between the symptom and the system condition. An automatic watering kits overview helps explain how tubing, drip outlets, timers, and water supply connections work together. A kit fault may involve a component condition, while a setup condition may involve pressure, layout, or connection factors.
Troubleshooting moves from symptom recognition to cause isolation before repair and prevention.
Troubleshooting moves from symptom recognition to cause isolation before repair and prevention. A blockage, leak, timer schedule issue, or flow restriction creates different observable patterns. The diagnostic sequence separates these conditions so the next action matches the affected part and surrounding setup.
A blockage, leak, timer schedule issue, or flow restriction creates different observable patterns.
A watering system problem can look similar across different situations, but the cause may differ between a kit fault, a setup condition, and a maintenance issue. For example, low flow may relate to supply, pressure, blockage, or layout conditions, while leaks may relate to tubing, connectors, valves, or seals. The following symptom classification organizes automatic watering kit troubleshooting by the visible problem first, then the likely cause area.
Table of Contents
Identify the watering kit symptom first
Identify the watering kit symptom first because the visible problem narrows the first check. A symptom shows how the automatic watering kit is behaving, while the likely cause is linked to the affected part, setup condition, or maintenance state. Matching the symptom to the first check helps separate flow, leak, timing, and moisture-related issues.

Similar symptoms can appear from different conditions in an automatic watering kit. No water may relate to a source, timer outlet, or flow condition, while uneven dripping may relate to an emitter, tubing, or blockage condition. A leak, puddle, or spraying pattern directs attention toward connection areas, while overwatering or unexpected watering requires checking timing and moisture conditions.
Similar symptoms can appear from different conditions in an automatic watering kit.
The symptom checklist below separates the visible sign from the first diagnostic direction. It helps classify whether the issue begins with flow, connections, timer control, or moisture response before moving into detailed troubleshooting.
- No water: Check the water source, timer outlet, and flow path to identify whether supply or control conditions are limiting delivery.
- Low flow or uneven dripping: Check emitters, tubing, and blockage conditions to identify whether water delivery is restricted.
- Leak, puddle, or spraying: Check connectors, tubing joints, and fitting connections to identify where water is escaping.
- Overwatering: Check schedule, emitter output, and soil moisture conditions to separate excessive delivery from moisture-related conditions.
- Timer failure or unexpected watering: Check the controller settings, timer operation, and valve response to identify timing-related causes.
No water, low flow, or uneven dripping
No water, low flow, or uneven dripping usually points to a supply restriction, pressure condition, blockage, layout imbalance, or closed control point. The first check is whether the symptom affects the whole automatic watering kit or only a specific watering zone or emitter.
These symptoms can appear from different conditions across the same kit.
These symptoms can appear from different conditions across the same kit. A dry emitter may relate to a blocked outlet, while weak flow across multiple emitters may relate to source water, timer outlet, tubing, valve, or filter conditions. Local checks help separate whole-kit flow issues from single-emitter issues before moving into detailed troubleshooting.

- Source water: Check the water supply condition; restricted source water can reduce or stop flow entering the kit.
- Timer outlet: Check the timer outlet condition; a closed or restricted control point can limit water reaching the tubing path.
- Main tubing: Check for kinks or restrictions in the main tubing; a blocked section can reduce flow to connected branches.
- Branch line: Check the branch line layout and connections; uneven flow can occur when delivery paths receive different conditions.
- Emitter: Check the emitter outlet condition; a dry emitter can indicate a local blockage or restricted drip outlet.
- Filter or valve: Check the filter condition and valve position; restrictions at these points can affect overall water delivery.
Leaks, puddles, spraying, or water escaping
Leaks, puddles, spraying, or water escaping usually point to a loose connection, cracked tube, damaged fitting, poor seal, or pressure-related condition. The leak location is the main diagnostic clue because where water escapes helps identify the affected part and the likely fault area.
Checking the leak position prepares the correct location-based checks.
A drip at a fitting and a spray from a tubing hole show different leak patterns. A connector drip may relate to fit or seal conditions, while spraying may relate to a crack or puncture in the tubing. Checking the leak position prepares the correct location-based checks.

Leaks, puddles, spraying, or water escaping should be read by location before checking individual parts.
- Connector: Check the connector fit and seal condition; dripping at a joint can indicate a loose connection or seal issue.
- Tubing hole: Check for a crack or puncture; spraying from the tubing can indicate a damaged section.
- Timer joint: Check the joint seal and fitting area; water escaping here can indicate a connection or sealing condition.
- Spigot thread or valve: Check the thread fit, seal, and valve area; leaks here can relate to connection or pressure conditions.
- Emitter outlet: Check the outlet fit and water escape pattern; dripping near an emitter can indicate a local connection issue.
Overwatering, timer failure, or unexpected watering
Overwatering or unexpected watering can come from timer programming, valve control, excessive run time, high emitter output, or a mismatch between water delivery and moisture conditions. The first check is whether the issue is caused by an automatic watering kit control condition or by the plant and soil response.
Timer settings and moisture conditions can create similar visible symptoms.
Timer settings and moisture conditions can create similar visible symptoms. A timer failure, manual mode setting, valve condition, or emitter output issue can create an unplanned cycle, while wet soil or poor drainage can create moisture problems even when the watering cycle operates as expected. Checking the schedule, run time, valve position, emitter output, soil moisture, and drainage conditions helps separate control faults from moisture-response issues.

Overwatering, timer failure, or unexpected watering can be separated by comparing the visible symptom with the likely control condition and moisture condition.
| Symptom pattern | Likely control issue | Moisture condition to verify |
|---|---|---|
| Unexpected watering | Timer schedule, manual mode, or valve cycle condition | Whether soil moisture matches the observed watering event |
| Overwatering | Emitter output, run time, or valve control condition | Soil moisture and drainage conditions around the plant |
| Continued plant stress | Kit control may not be the only factor after correction | Plant response, drainage, and surrounding growing conditions |
Water supply, pressure, and flow causes
Water supply, pressure, and flow causes help identify whether an automatic watering kit problem begins at the water source, pressure control, flow control, or layout design. The main cause group includes supply conditions, pressure conditions, control points, and tubing layout factors that influence emitter behavior.
The diagnostic table separates the main cause areas and the checks used to identify the next step.
Flow problems can appear when the water source, pressure regulator, valve, flow control, or tubing arrangement changes how water reaches emitters. A restriction at one point can create low flow, leaks, or uneven delivery depending on the kit type, emitter count, tube length, branch count, and elevation conditions. The diagnostic table separates the main cause areas and the checks used to identify the next step.

Water supply, pressure, and flow conditions change emitter behavior through the watering kit path. The table shows how each cause area connects to observable symptoms and a safe diagnostic direction.
| Cause area | What to check | Symptom it can create | Safe next step |
|---|---|---|---|
| Water source | Check water source availability and supply line condition | No water or reduced flow at multiple emitters | Confirm the supply path before checking downstream parts |
| Pressure regulator | Check regulator condition and pressure control function | Weak flow or uneven emitter behavior | Review the regulator condition within the kit requirements |
| Valve | Check valve position and opening condition | Restricted flow or interrupted delivery | Confirm the valve allows the intended flow path |
| Flow control | Check the flow control setting and restriction points | Low flow or uneven dripping | Compare the setting with the kit requirements |
| Tubing length | Check tube length, route, and connection layout | Reduced delivery at distant emitters | Review tubing arrangement and connected outlets |
| Branch load | Check branch count and emitter count connected to each path | Uneven delivery between sections | Compare branch conditions with the kit design limits |
| Elevation | Check elevation changes across the tubing route | Uneven dripping between higher and lower areas | Consider layout conditions affecting flow distribution |
Pressure and flow requirements should be reviewed as part of the conditions that influence emitter behavior. See the pressure and flow requirements for a deeper explanation of these delivery factors.
Low pressure at the source or supply line
Low pressure at the source or supply line can make the whole automatic watering kit weak even when emitters and tubing are clean. The first check is the source and supply line condition because upstream pressure issues can reduce downstream output.
These checks help identify the local fault condition and the next diagnostic step.
Check the water source, connection points, and control parts before treating the symptom as an emitter fault. A restricted supply line, loose connection, closed valve position, weak timer outlet flow, or upstream obstruction can affect pressure and flow reaching the kit. These checks help identify the local fault condition and the next diagnostic step.
- Source: Check that the water source is open and supplying water; a restricted source condition can reduce available flow.
- Supply line: Check the line connection and condition; a loose connection, obstruction, or damaged section can limit water reaching the kit.
- Timer outlet: Check the outlet connection and flow path; a restricted outlet condition can reduce delivery to downstream components.
- Valve: Check the valve position and operating condition; a closed or restricted valve can reduce supply through the system.
- Upstream restrictions: Check for blockages or connection issues before the kit; these conditions can reduce pressure and flow available to the watering system.
Pressure regulator, valve, or flow-control faults
Pressure regulator, valve, or flow-control faults can reduce, block, or destabilize water delivery in an automatic watering kit even when the source is working. The first check is the affected control part, its condition, and how it changes pressure or flow through the system.
Check each control point before considering part replacement.
Check each control point before considering part replacement. A regulator orientation issue, valve opening condition, flow-control position, debris inside controls, or wear condition can change emitter behavior. Cleaning, resetting, or verifying fit may be suitable next checks when the part condition allows it.
- Pressure regulator: Check the regulator orientation and condition; an incorrect position or restriction can affect pressure reaching emitters.
- Valve: Check the valve opening and condition; a closed or restricted valve can reduce or block water delivery.
- Flow-control: Check the flow-control position; an unsuitable setting can change the water reaching connected emitters.
- Control debris: Check for debris inside regulator, valve, or flow-control parts; restrictions can affect consistent flow.
- Wear condition: Check part wear and fit; worn components can change how pressure and flow are controlled.
Low pressure may prevent emitters from receiving suitable flow, while excessive pressure can place more stress on connectors and fittings. The next check should match the symptom with the affected part condition before selecting a repair path.
Layout restrictions that reduce flow at the emitters
Layout restrictions that reduce flow at the emitters can create weak delivery at the end of an automatic watering kit even when the source and main supply are working. The first check is the tubing layout, branch arrangement, and outlet conditions that may limit flow reaching distant emitters.
Checking the system arrangement helps separate a layout issue from another flow-related fault.
Tube length, branch count, bends, elevation changes, and emitter load are layout conditions that can affect end-point flow. These restrictions often appear as uneven dripping rather than total failure because closer emitters may receive different delivery conditions than distant outlets. Checking the system arrangement helps separate a layout issue from another flow-related fault.
- Tubing route: Check the route for bends, kinks, or restrictions; these conditions can reduce flow reaching connected emitters.
- Branch count: Check connector branches and connected lines; higher branch demand can change flow distribution across the kit.
- Emitter count: Check the number of emitters on the line; increased outlet load can affect end-point delivery.
- Tube length: Check distance from the source and longer tubing runs; distant emitters may show weaker flow under certain layouts.
- Elevation changes: Check height differences along the route; elevation conditions can affect uneven delivery between emitters.
End-of-line weakness differs from whole-kit low pressure because nearby emitters may continue working while only distant outlets show reduced flow. Review installation checks when the layout condition requires further investigation.
Clogged emitters and blocked tubing
Clogged emitters and blocked tubing can reduce flow in an automatic watering kit when debris, mineral buildup, algae, or particles restrict the water path. The main diagnostic job is to identify the blockage location and determine whether the condition requires cleaning, flushing, or another repair path.
Blockage after installation or storage can require checking for particles introduced into the water path.
A blocked emitter, filter screen, tube interior, or drip line end can create different flow symptoms depending on where the restriction occurs. Partial blockage may affect selected emitters, while repeated clogging may indicate a recurring debris condition. Blockage after installation or storage can require checking for particles introduced into the water path.
Debris location changes the next check because each blocked component affects flow differently.
Debris location changes the next check because each blocked component affects flow differently. The checklist below connects the blockage point with the condition and the symptom it may create.
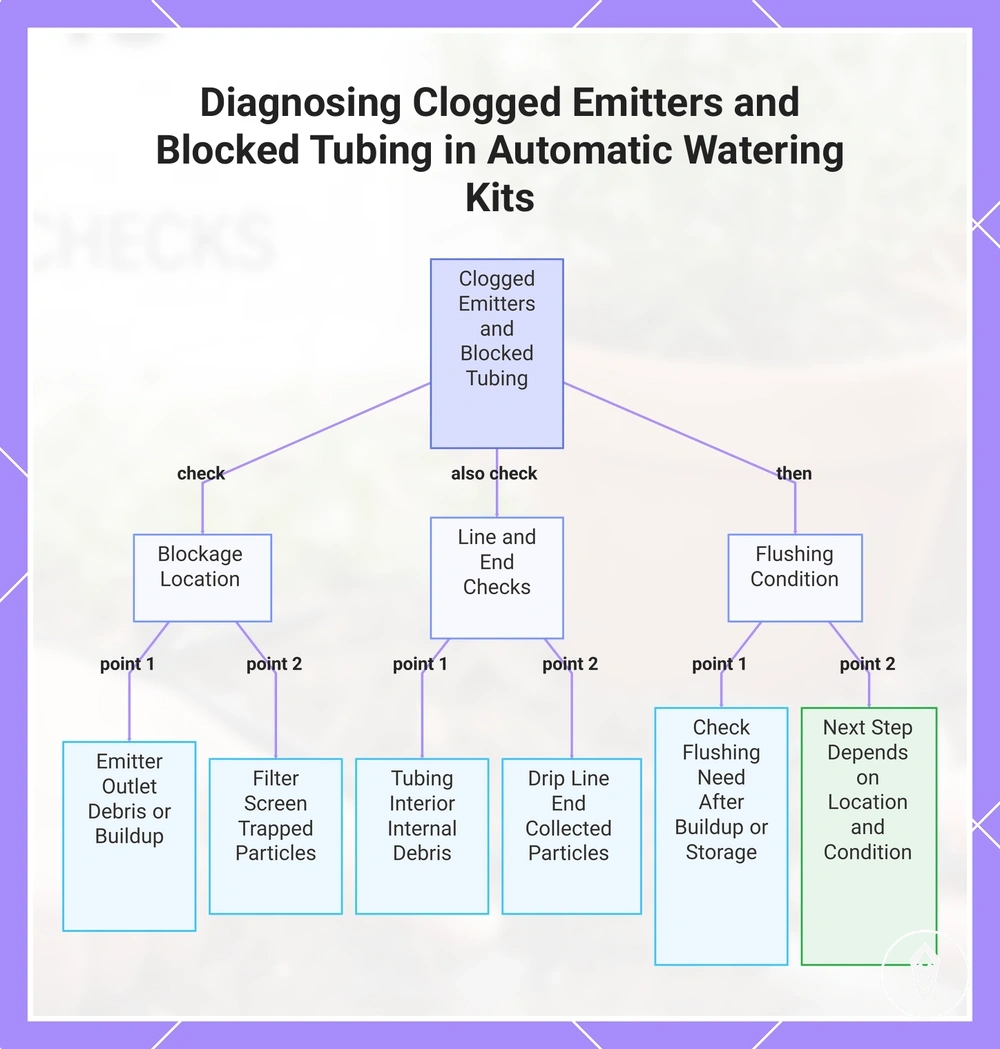
- Emitter outlet: Check the emitter opening for debris or mineral buildup; a clogged outlet can reduce flow at individual emitters.
- Filter screen: Check the filter screen condition; trapped particles can restrict water movement through the automatic watering kit.
- Tubing interior: Check inside the tubing for blockage conditions; internal debris can reduce flow along the line.
- Drip line end: Check the end section for collected particles or restrictions; a blocked end point can create weaker delivery.
- Flushing condition: Check whether flushing is needed after debris buildup or storage; the next step depends on the blockage location and condition.
If the issue involves tubing connections rather than a blockage inside the flow path, review tubing and connector issues for the related fault area.
This chart lists the main blockage points and checks to identify the location and condition of clogs in automatic watering systems.
This chart lists the main blockage points and checks to identify the location and condition of clogs in automatic watering systems.
Clean, flush, or replace blocked drip emitters
Clean, flush, or replace blocked drip emitters by checking the emitter condition and blockage type before choosing the next step. The correct repair path depends on whether the blocked drip emitter can be cleaned safely or whether replacement is more suitable for the automatic watering kit.
Clean, flush, or replace blocked drip emitters by checking the emitter condition and blockage type before choosing the next step.
Emitter type, blockage material, cleaning tolerance, replacement fit, and post-clean flow response determine the appropriate check. A blocked drip emitter with removable debris may respond to cleaning or flushing, while repeated blockage after cleaning may indicate a condition that requires further inspection.
- Remove the blocked emitter: Check the emitter connection and condition before removal to avoid damaging the surrounding tubing or fitting.
- Clean the emitter: Rinse the emitter and remove visible debris when the emitter type allows cleaning without affecting its flow path.
- Flush the system: Check the tubing or drip line condition and flush where suitable to clear loose particles affecting flow.
- Reinstall and retest: Check the emitter fit and observe post-clean flow response to confirm whether water delivery improves.
- Replace when needed: Replace the drip emitter when cleaning fails, the blockage returns quickly, or the emitter condition prevents reliable flow.
Cleaning methods should match the emitter condition because unsuitable methods may damage some emitter types. A replacement check is more appropriate when the blockage persists after suitable cleaning or the emitter no longer provides the expected flow response.
Remove debris from filters, tubes, and drip lines
Remove debris from filters, tubes, and drip lines by checking upstream blockage points before cleaning individual drip emitters again. Debris inside an automatic watering kit can continue affecting flow when filters, tubes, or line ends remain restricted.
The debris location determines the correct check because each component condition affects water movement differently.
The debris location determines the correct check because each component condition affects water movement differently. Filter screen condition, tubing debris, line-end access, water quality, and flushing direction help identify whether the next step is cleaning, flushing, or further inspection.
- Filters: Check the filter screen condition and remove trapped debris that restricts flow through the automatic watering kit.
- Tubes: Check tubes for internal debris or restrictions; flushing can help clear loose particles when suitable for the system condition.
- Drip lines: Check drip line ends and access points; opening the line end can help remove collected debris before retesting flow.
- Flushing direction: Check the water path direction before flushing so loosened debris moves away from sensitive drip components.
- Retest flow: Check the drip response after cleaning to determine whether the debris condition has been reduced.
Storage, soil exposure, or hard water conditions may change the cleaning approach because debris type affects the suitable next check. Use methods that match the automatic watering kit components and avoid actions that may damage incompatible parts.
Leaks in tubing, connectors, timers, and valves
Leaks in tubing, connectors, timers, and valves can be diagnosed by locating where water escapes and matching that location with the affected part condition. The main check is whether the leak relates to tubing damage, connector fit, timer outlet joints, valve condition, seals, or pressure effects within the automatic watering kit.
The leak position helps determine whether tightening, sealing, cutting, or replacing a part is the appropriate repair path.
The leak position helps determine whether tightening, sealing, cutting, or replacing a part is the appropriate repair path. A slow drip, spray, or leak that appears only when the timer opens can indicate different conditions, so check the part where water appears before changing components.
| Leak area | Condition to check | Symptom | Safe next step |
|---|---|---|---|
| Tubing | Check tubing for cuts, damage, or stress at connection points | Drips or sprays along the water path | Assess the tubing condition and repair the affected area when suitable |
| Connectors | Check connector fit, seals, and connection condition | Water escaping at joints | Check the connection position and sealing condition before replacing parts |
| Timer outlet | Check the timer outlet joint and connection condition | Leak appears when the timer opens | Inspect the outlet connection during the watering cycle |
| Spigot thread | Check thread fit and seal condition at the water source | Slow drip near the supply connection | Review the thread connection and sealing condition |
| Valves and seals | Check valve condition, seal wear, and pressure effects | Persistent leaking around control points | Assess the valve area condition before selecting a repair path |
Repair damaged tubing and drip line holes
Repair damaged tubing and drip line holes by isolating the affected section and checking the tubing condition before making a repair. Holes, splits, pinches, or brittle sections can reduce flow or create leaks in an automatic watering kit when the damaged area affects the water path.
The repair path depends on the tubing condition, tube diameter, wall condition, cut quality, connector fit, and pressure condition.
The repair path depends on the tubing condition, tube diameter, wall condition, cut quality, connector fit, and pressure condition. A straightforward repair may involve removing the damaged section and fitting a suitable connector, while repeated damage or material degradation may require replacing the affected tubing section.
- Isolate the damaged area: Check the tubing section for holes, splits, pinches, or brittle areas and stop water flow before starting the repair.
- Cut the damaged tubing: Remove the affected section with a clean cut so the tubing ends are ready for a connector or replacement section.
- Insert the repair connection: Check connector fit with the tubing diameter and install a coupler or replacement section when the tubing condition allows repair.
- Retest the drip line: Check the repaired area under operating conditions and observe whether leaks or reduced flow remain.
A spot repair may be less suitable when tubing wear continues across multiple areas or the material condition causes repeated failures. Check the tubing condition before choosing between a local repair and a larger replacement section.
Tighten, seal, or replace leaking connectors
Tighten, seal, or replace leaking connectors by checking the leak pattern and connector condition before choosing the repair path. Connector fit, wear, pressure load, and connection type determine whether the next step is adjustment, reseating, sealing, or replacement.
A leaking connector in an automatic watering kit should be checked at the point where water escapes.
A leaking connector in an automatic watering kit should be checked at the point where water escapes. Loose push-fit leaks may require checking tube seating and connector fit, while cracked connectors may require replacement because the part condition affects the safe next step.
- Push-fit connectors: Check tube seating and connector fit; a loose connection may require reseating before further action.
- Barbed fittings, tees, and elbows: Check the fitting grip and connector condition; poor fit or wear can contribute to leaking joints.
- Threaded joins: Check thread alignment, washers, and seal condition; incorrect fit can allow water to escape.
- O-rings and seals: Check sealing components for wear or damage; a worn seal may require replacement when it no longer maintains the connection.
- Pressure load: Check pressure conditions around the connector; pressure stress can affect leak behaviour depending on the connector condition.
A cracked or damaged connector may need replacement rather than tightening or sealing. Avoid force-fitting connectors or using sealing methods that do not match the connector type or material condition.
Check timer, spigot, and valve leaks separately
Check timer, spigot, and valve leaks separately because these parts have different seals, connection points, and pressure conditions from tubing leaks. The first check is the leak location and the affected part condition within the automatic watering kit.
The first check is the leak location and the affected part condition within the automatic watering kit.
Timer leaks, spigot leaks, and valve leaks require separate checks because the part, seal, and connection condition change the likely fault area. A timer that works electronically but leaks mechanically at a fitting requires checking the fitting condition rather than the timer control settings.
- Timer inlet and outlet: Check thread alignment, connection fit, and seal condition; leaks near the timer inlet or outlet may relate to a fitting or sealing issue.
- Spigot thread: Check the tap thread and washer condition; poor fit or a worn washer may allow water to escape at the connection point.
- Valve body: Check the valve body condition and closure point; leaks around the valve area may require inspection of the valve components.
- Active cycle leaks: Check whether water escapes only when the timer opens; cycle-related leaks can help identify pressure and connection conditions.
Timer and controller problems
Timer and controller problems can affect an automatic watering kit when control settings, power conditions, display functions, or valve responses do not match the expected watering cycle. The first check is whether the problem relates to the timer condition, controller settings, or the response of connected parts.
The first check is whether the problem relates to the timer condition, controller settings, or the response of connected parts.
Automatic control can fail even when manual watering works because the controller, power source, schedule, or valve response may create different operating conditions. Check the controller type and condition before changing settings, because analogue, digital, smart, pump-based, and tap-mounted controllers may use different control methods.
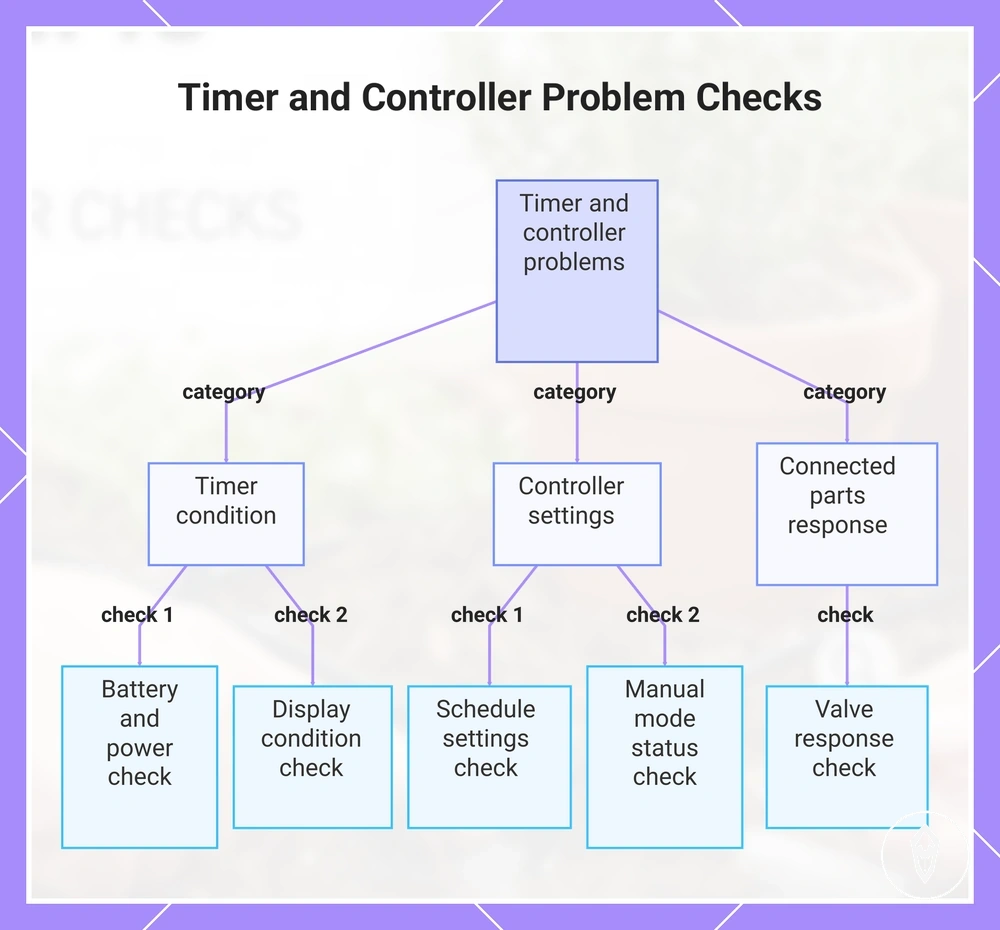
- Batteries and power: Check the battery condition or power connection; a power fault can affect controller operation and display behaviour.
- Display: Check the display condition and control response; a display issue can prevent accurate setting changes.
- Schedule: Check start time, duration, and frequency settings; incorrect schedule conditions can change the watering cycle.
- Manual mode: Check manual-mode status; an active manual setting can affect normal automatic operation.
- Valve response: Check solenoid or valve response when the controller activates; a controller signal issue and a valve condition require separate checks.
- Reset condition: Check whether a reset is needed for the controller condition and setup type.
Review the timer and flow setup when controller timing, watering cycles, and flow behaviour need to be assessed together.
Review the timer and flow setup when controller timing, watering cycles, and flow behaviour need to be assessed together.
This chart shows the three main categories of checks for timer and controller problems in automatic watering kits, including specific checks for power, display, schedule, manual mode, and valve response.
Programming, battery, reset, and display issues
Programming, battery, reset, and display issues should be checked before treating timer behaviour as a hardware fault. Check the automatic watering kit controller condition, power source, settings, and response to identify whether the issue relates to control settings or a component condition.
Programming, battery, reset, and display issues should be checked before treating timer behaviour as a hardware fault.
Timer issues can involve battery condition, display state, program memory, watering duration, start time, or reset response. A blank display and a missed schedule require different checks because a blank display relates to power or screen condition, while a missed schedule may relate to programming or mode settings.
- Check the battery: Check battery condition and polarity; incorrect installation or weak battery condition can affect controller operation.
- Check the display: Check the screen state and controller response; a blank display may indicate a power or display condition that requires further checking.
- Review programming: Check start time, watering duration, frequency, and saved program settings; incorrect settings can change the watering cycle.
- Test a manual cycle: Check manual operation to compare controller response with the programmed schedule.
- Reset and retest: Check the reset response and retest the controller condition after restoring settings.
Manual watering works but automatic watering fails
Manual watering working while automatic watering fails narrows the check toward timer programming, valve actuation, power, schedule, or automatic mode conditions rather than the entire water path. Check the difference between manual and automatic operation to identify the automatic watering kit fault area.
Check the difference between manual and automatic operation to identify the automatic watering kit fault area.
When manual watering delivers water correctly, the water path may be operating while the automatic control path requires further checking. Compare manual mode, automatic mode, valve opening response, programmed duration, start time, battery condition, and timer outlet behaviour before considering timer replacement.
- Manual mode: Check whether manual watering opens the valve and delivers water; a successful manual cycle helps separate control issues from wider flow conditions.
- Automatic mode: Check the automatic schedule and mode status; incorrect settings can prevent the programmed watering cycle from starting.
- Valve opening: Check whether the valve responds during an automatic cycle; a valve actuation issue can stop water delivery even when manual watering works.
- Program settings: Check start time and watering duration; incorrect values can change automatic watering behaviour.
- Power and timer outlet: Check battery condition and timer outlet response; a power or outlet condition can affect automatic control.
If manual watering also fails, check the broader water path and supply conditions before focusing on automatic control. Timer replacement should only be considered after power, programming, and reset checks fail to resolve the issue.
Overwatering and uneven plant moisture
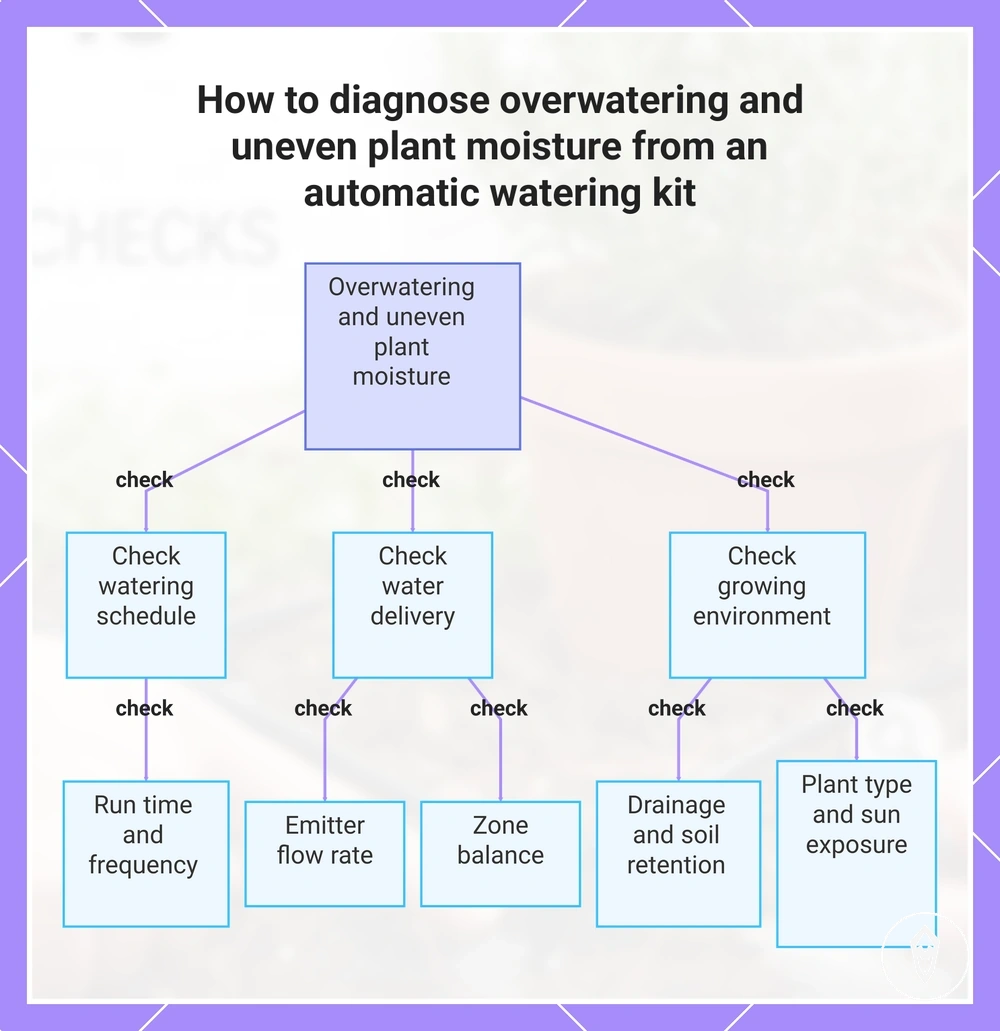
Overwatering and uneven plant moisture should be checked by comparing automatic watering kit settings with soil and plant conditions before assuming the kit has a fault. The main diagnostic check is whether schedule, emitter output, and growing conditions match the moisture result.
The main diagnostic check is whether schedule, emitter output, and growing conditions match the moisture result.
Moisture issues can relate to run time, frequency, emitter flow rate, drainage, soil retention, plant type, sun exposure, or zone balance. A functioning automatic watering kit with unsuitable settings can create excess moisture or uneven results, while a true kit fault requires checking the affected components and their condition.
- Run time and frequency: Check watering duration and schedule frequency; longer cycles or frequent cycles can change moisture conditions.
- Emitter flow: Check emitter flow rate and outlet condition; uneven delivery between emitters can create different moisture levels.
- Drainage and soil retention: Check pot drainage and soil condition; water retention can affect how moisture remains around the plant.
- Plant type and sun exposure: Check plant conditions and light exposure; different plant environments can change moisture requirements.
- Zone balance: Check watering zones and moisture response; uneven zones can indicate different delivery or environmental conditions.
This chart shows the three main checks to compare watering kit settings with plant and soil conditions before assuming a kit fault.
Adjust schedule, run time, and emitter output
Adjust schedule, time, and emitter output by making controlled changes and checking the moisture response before changing additional settings. The first check is whether the automatic watering kit settings match the plant condition, soil moisture, and delivery pattern.
The first check is whether the automatic watering kit settings match the plant condition, soil moisture, and delivery pattern.
Moisture changes should be assessed against timer duration, watering intervals, emitter output, plant grouping, pot size, and drainage conditions. Testing one variable at a time can help identify whether the issue relates to schedule settings, emitter output, or another condition affecting moisture.
- Adjust the schedule: Check watering frequency and interval settings; change the schedule when the current cycle does not match the observed moisture condition.
- Adjust watering time: Check timer duration; change the watering time based on soil moisture response, plant need, and kit configuration rather than using a fixed setting.
- Check emitter output: Check emitter rate and placement; adjust output when uneven delivery creates different moisture conditions between plants.
- Check plant grouping: Check plant grouping, pot size, and drainage; different container conditions can affect moisture outcomes.
- Retest moisture: Check soil moisture over later cycles before making further adjustments.
Separate kit faults from plant recovery problems
Separate kit faults from plant recovery problems by checking whether the automatic watering kit is delivering the intended water pattern before judging ongoing plant symptoms. Plant recovery can follow a different timeline from a corrected kit condition, so the main check is whether the watering issue is still active.
Compare current kit function with plant response criteria to identify whether the issue is a delivery fault or a recovery condition.
Compare current kit function with plant response criteria to identify whether the issue is a delivery fault or a recovery condition. Soil moisture, leaf condition, root condition, previous overwatering, drainage, and time since adjustment help separate an active automatic watering kit problem from a plant recovery problem.
Kit function: Check whether the automatic watering kit delivers the expected moisture pattern.
Kit function: Check whether the automatic watering kit delivers the expected moisture pattern. A kit with correct operation but unsuitable settings may create moisture issues, while a kit fault affects the intended delivery condition.
- Soil moisture: Check current moisture conditions to assess whether watering adjustments have changed the soil environment.
- Leaf and root condition: Check plant symptoms as recovery indicators without assuming they identify the original kit fault.
- Previous overwatering: Check earlier moisture conditions because previous excess water can affect current plant recovery.
- Drainage: Check drainage condition because retained moisture can influence recovery after watering changes.
- Time since adjustment: Check the time after a setting change before separating recovery problems from an active kit fault.
When to repair, replace, or escalate kit parts
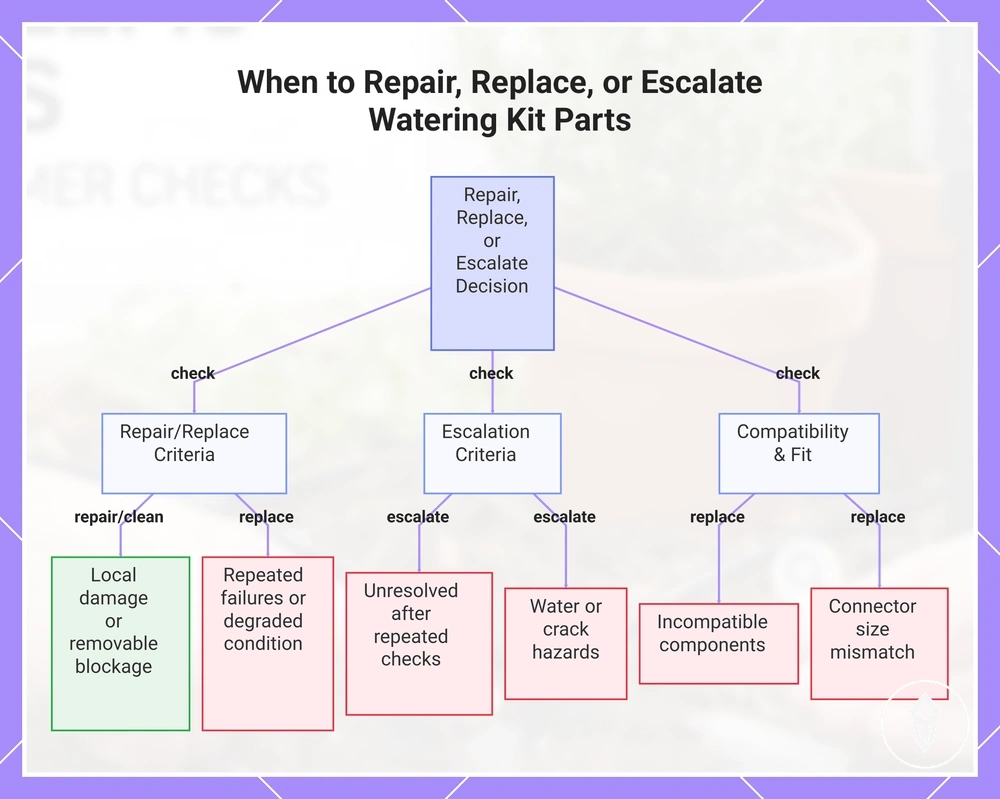
Decide when to repair, replace, or escalate automatic watering kit parts by checking the part condition, repeated symptoms, safety concerns, and compatibility of the affected component. The correct repair path depends on whether the part can be adjusted, cleaned, repaired, replaced, or requires further assessment.
Check each part condition against the symptom pattern before changing components.
Check each part condition against the symptom pattern before changing components. A loose connection, removable blockage, or adjustable setting may require a different repair path from a cracked part, repeated failure, incompatible fit, or a safety concern involving electrical controls.
- Tubing: Check for leaks, splits, or damage; local damage may allow repair, while repeated failures or degraded condition may require replacement.
- Connectors and seals: Check fit, wear, and sealing condition; loose fittings may need adjustment, while cracked connectors or worn seals may require replacement.
- Emitters and filters: Check flow symptoms and clogging condition; removable debris may allow cleaning, while persistent clogging or damaged parts may require replacement.
- Valves and pressure regulators: Check valve response, pressure conditions, and component condition; persistent faults after suitable checks may require further assessment.
- Timers and controls: Check reset response, power condition, and control behaviour; water near electrical controls or unresolved control faults may require escalation.
- Compatibility and fit: Check connector size and part compatibility; incompatible components may require a suitable replacement rather than force-fitting.
Escalate the issue when repeated checks do not resolve the fault, when cracked or damaged parts affect safe operation, or when water exposure involves electrical control components.
This chart shows the decision logic for determining whether to repair, replace, or escalate a part based on condition, symptoms, safety, and compatibility.
This chart shows the decision logic for determining whether to repair, replace, or escalate a part based on condition, symptoms, safety, and compatibility.
Maintenance checks that prevent recurring problems
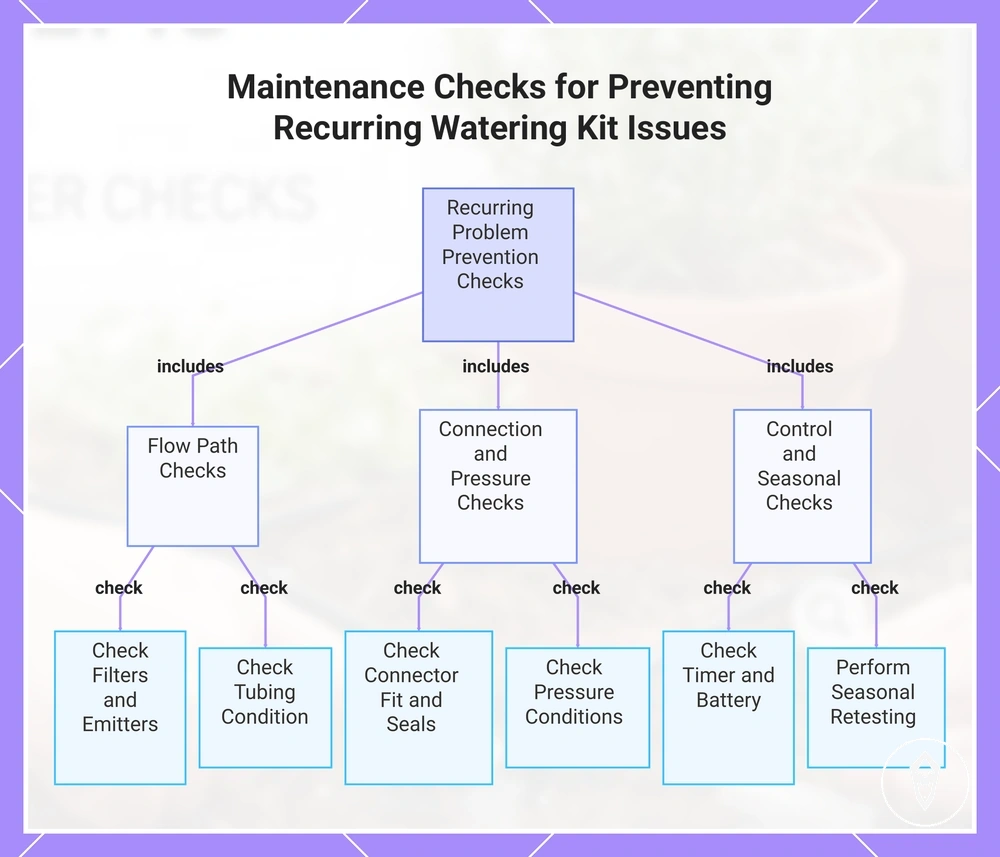
Maintenance checks that prevent recurring problems help identify conditions that may cause repeated automatic watering kit issues before they affect watering performance. The main check is whether debris, pressure changes, loose fittings, worn seals, storage conditions, or schedule drift are creating a recurring fault pattern.
Recurring problems should be reviewed through part condition and symptom checks rather than treated as isolated failures.
Recurring problems should be reviewed through part condition and symptom checks rather than treated as isolated failures. Cleaning, inspection, and retesting can help determine whether the issue relates to blocked flow paths, connection condition, pressure conditions, or control settings.
- Filters and emitters: Check filter condition and emitter output; debris buildup or restricted flow conditions can affect water delivery.
- Connectors and seals: Check connector fit and seal condition; loose fittings or worn seals can contribute to repeated leaks.
- Tubing: Check tubing condition for damage, wear, or movement; recurring leaks may require reviewing the affected section.
- Timer and battery: Check timer operation and battery condition; power changes can affect automatic watering kit control behaviour.
- Pressure conditions: Check pressure-related conditions around regulators and valves; changes can influence flow behaviour and component performance.
- Seasonal retesting: Check the system after storage, moved pots, travel periods, or schedule changes; changed conditions can create new recurring problems.
For broader routine details, review the maintenance guide when recurring checks need to be organized beyond individual troubleshooting issues.
This chart groups the key maintenance checks that help identify and prevent recurring automatic watering kit problems.
This chart groups the key maintenance checks that help identify and prevent recurring automatic watering kit problems.